#docker port forwarding existing container
Explore tagged Tumblr posts
Visit Tumblr Blog
Explore Tumblr blogs with no restrictions, modern design and the best experience.
Last Seen Tumblr Blogs


Fun Fact
If you dial 1-866-584-6757, you can leave an audio post for your followers.
Text
Docker Container Port Mapping Tutorial for beginners | Docker Port Expose and Port Forwarding
Full Video Link: https://youtu.be/2gie3gpDJUg Hi, a new #video on #dockerportmapping is published on @codeonedigest #youtube channel. Learn docker container port forwarding and docker expose. What is docker port mapping and -p option. Running docker cont
Docker container port mapping and port forwarding. Docker expose attribute in Docker file is used to forward container port to the host machine. Running docker container on custom port. Using docker expose, run the docker application on specific port. How to run docker image on specific port? What is port mapping in docker container? Why docker port mapping is not working? Why containerized…

View On WordPress
#docker#docker and Kubernetes#docker compose#docker compose port mapping#docker container port change#docker container port forwarding not working#docker container port mapping#docker container port mapping explained#docker container port not exposed#docker container ports explained#docker port forwarding#docker port forwarding doesn’t work#docker port forwarding existing container#docker port forwarding running container#docker port mapping#docker port mapping explained#docker port mapping not working#docker port mapping tutorial#docker port mapping vs expose#docker tutorial#docker tutorial for beginners#port mapping in running docker container#run docker container on custom port#update docker container portainer#what is docker
0 notes
Text
The reign of containerized applications is here and it is here indeed. Talking of Kubernetes, Docker, Podman, Openshift and the rest of important platforms that push for a containerized world, you will definitely need tools to make your work better. Whether it is visualizing your pods, your deployments, viewing your logs and resources, then you are in for a pleasurable treat. If you have a raw Kubernetes cluster and you feel the Kubernetes dashboard is not something you can work with, then this guide offers one alternative that you can look at and decide if it is something you can settle with. We proudly present VMware Octant. Before we jump into the pool, let us investigate what you can expect from its waters. VMware Octant is a tool for developers to understand how applications run on a Kubernetes cluster. It aims to be part of the developer’s toolkit for gaining insight and approaching complexity found in Kubernetes. Octant offers a combination of introspective tooling, cluster navigation, and object management along with a plugin system to further extend its capabilities. Impressive Features you will find. VMware Octant is a beauty peagent that gets brilliant cheers from its audience due to the following features: Visualization: VMware Octant provides a visual interface to managing Kubernetes that complements and extends existing tools like kubectl and kustomize. Extensibility: You can add information to your cluster views through Octant’s plug-in system. Versatility: VMware Octant supports a variety of debugging features such as filtering labels and streaming container logs to be part of the Kubernetes development toolkit. Port forward: Debug applications running on a cluster in a local environment by creating port forwards through an intuitive interface. Plug-ins over gRPC: With Octant’s plug-in API, core features can be extended to meet the needs of customized workflows on a cluster. Real-time updates: With a complete view of an object and all its related objects, you can more accurately assess the status of applications and avoid unfocused debugging when things go wrong Label Filter: Organize workloads with label filtering for inspecting clusters with a high volume of objects in a namespace. Log Stream: View log streams of pod and container activity for troubleshooting or monitoring without holding multiple terminals open. Can be installed on all platforms: That is Windows, Linux and macOS. Octant Plugins Plugins are a core part of Octant in the Kubernetes ecosystem. A plugin can read objects and allows users to add components to Octant’s views. With that said, it is the intention of this guide to get VMware Octant installed and explored as well as well get to see how some plugins can be added and utilized therein. Without further delays, I believe we are now comfortable and ready to plunge into the waters. How To Install VMware Octant To get VMware Octant installed, you can be in Windows, Linux or macOS systems and you will accrue the same benefits. The following are the steps involved in getting VMware Octant installed. Step 1: Update your server and install necessary applications Depending on your platform, simply update your Operating system to get the latest packages and patches as well as installing essential packages such as git ###For Ubuntu### sudo apt update && sudo apt upgrade sudo apt install vim git curl wget -y ###For CentOS### sudo yum update sudo yum install vim git curl wget -y Step 2: Install VMware Octant on Linux / macOS / Windows In this section you’ll be able to install VMware Octant on Linux, macOS and Windows. Install VMware Octant on Linux If you are on a distribution that supports .deb or .rpm, there are packages available for you. Depending on the architecture of your system simply visit the official releases page, download the packages matching your architecture and install them as follows: ##For DEB-based systems wget https://github.com/vmware-tanzu/octant/releases/download/v0.16.1/octant_0.16.1_Linux-64bit.deb
sudo dpkg -i octant_0.16.1_Linux-64bit.deb ##For RPM-based systems wget https://github.com/vmware-tanzu/octant/releases/download/v0.16.1/octant_0.16.1_Linux-64bit.rpm sudo rpm -ivh octant_0.16.1_Linux-64bit.rpm Installing VMware Octant on Windows If you are on Windows, you can get your Octant running as well. To make your work easier, VMWare Octant is available as packages that Chocolatey and Scoop can fetch and install. If you do not have Chocolatey installed, you can use this how to install Chocolatey guide to get it running quick. Install using Chocolatey choco install octant --confirm Install using Scoop ###Add the extras bucket. scoop bucket add extras ##Then Install Octant scoop install octant Installing VMware Octant on macOS For our macOS group of people, Homebrew always comes to the rescue and the following one-liner will make you happy: brew install octant Step 3: Getting Started with VMware Octant Octant is configurable through environment variables defined during runtime, here are some of the notable variables you will enjoy to use: i. Starting Octant with a given IP address and port Environment variables defined at runtime can for example be like the one shared below where we specify the IP address and port we would wish the application to listen from and be accessed by. The command below will cause Octant to be accessed from any IP and at port 8900. OCTANT_LISTENER_ADDR=0.0.0.0:8900 octant Running the above command on your terminal exposes Octant on the IP of your server on the port specified. If you have a firewall running, you should allow that port for access. Finally, point your browser to the ip and port (http::8900) and you should see an interface as shown below. If will first ask you for the contents of your cluster’s config file for it to connect to it. Paste the contents of your config file as illustrated below then hit “UPLOAD” button. Once connected, you will be ushered into your cluster in the default namespace You can view all of the namespaces that you have. And view the resources within each namespace Conveniently check out your Nodes: And much much more. Step 4: Adding Plugins to VMware Octant Installation Plugins are binaries that run alongside developer dashboard to provide additional functionality. Plugins are built using go-plugin in order to communicate with the dashboard over gRPC. They can read objects and allows users to add components to Octant’s views. Plugins can do the following: Add new tabs to the dashboard Include additional content to an existing summary section Create a new section in an existing tab Port forward to a running pod In order to add plugins, we will need to install Go. If you are on CentOS you can use: How To Install Go on CentOS 8 | CentOS 7 and those in Ubuntu can use Install Go (Golang) on Ubuntu. Once Go (Golang) is installed, run the following to install a sample plugin: $ cd ~ $ git clone https://github.com/vmware-tanzu/octant.git $ cd ~/octant/ $ go run build.go install-test-plugin 2020/10/23 17:19:45 Plugin path: /home/vagrant/.config/octant/plugins 2020/10/23 17:19:45 Running: /home/vagrant/.go/bin/go build -o /home/vagrant/.config/octant/plugins/octant-sample-plugin github.com/vmware-tanzu/octant/cmd/octant-sample-plugin Once the sample plugin has been installed, launch Octant once again and view the plugins section. You should see “Sample Plugin” as shown below. More details of the plugin can also be viewed as shared below. If you have any custom plugins, Octant can be extended. It is that flexible. Find more about VMWare Octant at its official webpage Culmination Desiring a tool that makes sure your work is lighter and better is all most developers are looking for to help them visualize and get all information they would need to see their applications scale and grow. It is without a doubt that VMWare Octant is a promise keeper and a vigorous performer.
It presents Kubernetes workloads and resources in a friendly and easy to follow fashion which will boost your work and take a load off your chest if you would wish to expand and diversify kubectl command. Get it installed and explore even more as you see if it is a tool you can keep and use.
0 notes
Text
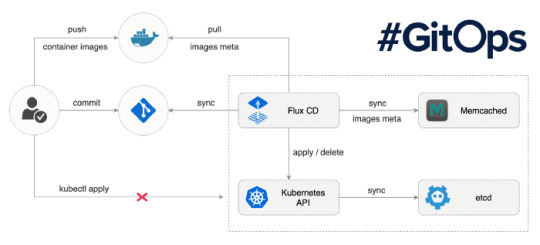
Overview of GitOps

What is GitOps? Guide to GitOps — Continuous Delivery for Cloud Native applications
GitOps is a way to do Kubernetes cluster management and application delivery. It works by using Git as a single source of truth for declarative infrastructure and applications, together with tools ensuring the actual state of infrastructure and applications converges towards the desired state declared in Git. With Git at the center of your delivery pipelines, developers can make pull requests to accelerate and simplify application deployments and operations tasks to your infrastructure or container-orchestration system (e.g. Kubernetes).
The core idea of GitOps is having a Git repository that always contains declarative descriptions of the infrastructure currently desired in the production environment and an automated process to make the production environment match the described state in the repository. If you want to deploy a new application or update an existing one, you only need to update the repository — the automated process handles everything else. It’s like having cruise control for managing your applications in production.
Modern software development practices assume support for reviewing changes, tracking history, comparing versions, and rolling back bad updates; GitOps applies the same tooling and engineering perspective to managing the systems that deliver direct business value to users and customers.

Pull-based Deployments

more info @ https://gitops.tech
The Pull-based deployment strategy uses the same concepts as the push-based variant but differs in how the deployment pipeline works. Traditional CI/CD pipelines are triggered by an external event, for example when new code is pushed to an application repository. With the pull-based deployment approach, the operator is introduced. It takes over the role of the pipeline by continuously comparing the desired state in the environment repository with the actual state in the deployed infrastructure. Whenever differences are noticed, the operator updates the infrastructure to match the environment repository. Additionally the image registry can be monitored to find new versions of images to deploy.
Just like the push-based deployment, this variant updates the environment whenever the environment repository changes. However, with the operator, changes can also be noticed in the other direction. Whenever the deployed infrastructure changes in any way not described in the environment repository, these changes are reverted. This ensures that all changes are made traceable in the Git log, by making all direct changes to the cluster impossible.
In Kubernetes eco-system we have overwhelming numbers of tools to achieve GitOps. let me share some of the tools as below,
Tools
ArgoCD: A GitOps operator for Kubernetes with a web interface
Flux: The GitOps Kubernetes operator by the creators of GitOps — Weaveworks
Gitkube: A tool for building and deploying docker images on Kubernetes using git push
JenkinsX: Continuous Delivery on Kubernetes with built-in GitOps
Terragrunt: A wrapper for Terraform for keeping configurations DRY, and managing remote state
WKSctl: A tool for Kubernetes cluster configuration management based on GitOps principles
Helm Operator: An operator for using GitOps on K8s with Helm
Also check out Weavework’s Awesome-GitOps.
Benefits of GitOps
Faster development
Better Ops
Stronger security guarantees
Easier compliance and auditing
Demo time — We will be using Flux
Prerequisites: You must have running Kubernetes cluster.
Install “Fluxctl”. I have used Ubuntu 18.04 for demo.
sudo snap install fluxctl
2. Create new namespace called “flux”
kubectl create ns flux
3. Setup flux with your environmental repo. We are using repo “flux-get-started”.
export GHUSER="YOURUSER" fluxctl install \ --git-user=${GHUSER} \ --git-email=${GHUSER}@users.noreply.github.com \ [email protected]:${GHUSER}/flux-get-started \ --git-path=namespaces,workloads \ --namespace=flux | kubectl apply -f -
4. Set Deploy key in Github. You will need your public key.
fluxctl identity --k8s-fwd-ns flux


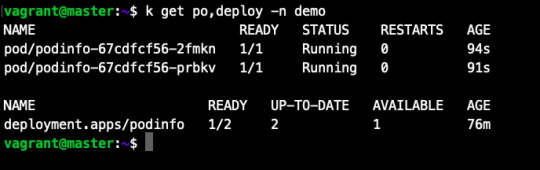
5. At this point you must have following pods, Services running on your cluster. (In “flux” and “demo” namespace)

namespace: flux

namespace: demo
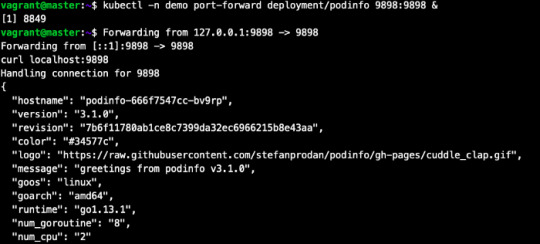
6. Let’s test what we have deployed.
kubectl -n demo port-forward deployment/podinfo 9898:9898 & curl localhost:9898
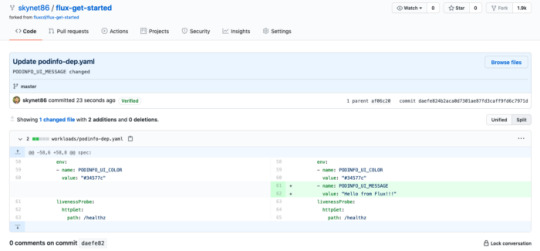
7. Now, lets make small change in repo and commit it to master branch.
By default, Flux git pull frequency is set to 5 minutes. You can tell Flux to sync the changes immediately with:
fluxctl sync --k8s-fwd-ns flux
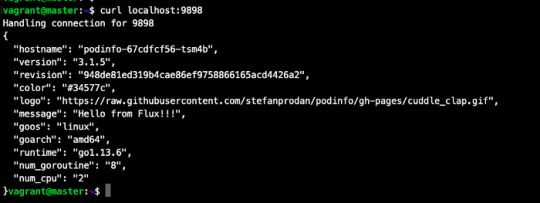
Wow our changes from our repo has been successfully applied on cluster.
our changes from our repo has been successfully applied on cluster.
Let’s do one more test, assume that by mistake someone has reduced/deleted your pods on production cluster.

By default, Flux git pull frequency is set to 5 minutes. You can tell Flux to sync the changes immediately with:
fluxctl sync --k8s-fwd-ns flux
You have successfully restored your cluster in GitOps way. No Kubectl required!!
Whenever the deployed infrastructure changes in any way not described in the environment repository, these changes are reverted.
Thank You for reading.
Source:
#cloud native application#cloud app development#software development#mobile app development#kubernetes cluster#WeCode Inc#Japan
0 notes
Text
Xdebug Chrome

Xdebug is an extension for debugging your PHP. The following explains how to configure Xdebug and PhpStorm to debug in your local environment. You can use the IDE of your choice. See the vendor documentation for those applications for further configuration information.
Xdebug Helper
Xdebug Chrome Extension
Chrome Xdebug Not Working
Xdebug Chrome How To Use
You will surely like this chrome extension if you love debugging, profiling and tracing PHP code with Xdebug. It comes handy for PHP developers that loves using PHP tools with Xdebug support like PHPStorm, Eclipse with PDT, Netbeans and MacGDBp or any other Xdebug compatible profiling tool like KCacheGrind, WinCacheGrind or Webgrind. Enabling XDEBUG in Web Browsers Chrome. There are two really useful plugins for Chrome that you should install: XDEBUG Helper- This will enable you to turn XDEBUG on and off from your web browser without having to modify the URL. This is essential when debugging a POST type form submission where you can't just enter a URL.
You can configure Xdebug to run in the Magento Cloud Docker environment for local debugging without changing your Magento Commerce Cloud project configuration. See Configure Xdebug for Docker.
To set up Xdebug, you need to configure a file in your Git repository, configure your IDE, and set up port forwarding. You can configure settings in the magento.app.yaml file. After editing, you can push the Git changes across all Starter environments and Pro Integration environments to enable Xdebug. To push these settings to Pro plan Staging and Production environments, you must enter a ticket.
Once configured, you can debug CLI commands, web requests, and code. Remember, all Magento Commerce Cloud environments are read-only. You need to pull code to your local development environment to perform debugging. For Pro Staging and Production environments, we include additional instructions for Xdebug.
Requirements
To run and use Xdebug, you need the SSH URL for the environment. You can locate the information through the Project Web Interface or your Cloud Onboarding UI.
Configure Xdebug
To configure Xdebug, you need to do the following:
Work in a branch to push file updates
Configure your IDE, like PhpStorm
For configuring on Pro plan Staging and Production, you need to enter a ticket for Staging and Production.
Get started with a branch
To add Xdebug, we recommend creating a branch to work in and add the files.

To get started with environment branches:
On your local workstation, change to your Cloud project directory.
Switch to the Magento file system owner.
Log in to your Magento project.
List your projects.
List environments in the project. Every environment includes an active Git branch that contains your code, database, environment variables, configurations, and services.
It is important to use the magento-cloud environment:list command because it displays environment hierarchies, whereas the git branch command does not.
Fetch origin branches to get the latest code.
Checkout, or switch to, a specific branch and environment.
Git commands only checkout the Git branch. The magento-cloud checkout command checks out the branch and switches to the active environment.
You can create a new environment branch using the magento-cloud environment:branch <environment-name> <parent-environment-ID> command syntax. It may take some additional time to create and activate a new environment branch.
Use the environment ID to pull any updated code to your local. This is not necessary if the environment branch is new.
(Optional) Create a snapshot of the environment as a backup.
Enable Xdebug in your environment
To enable Xdebug for your project, add xdebug to the runtime:extensions section of the .magento.app.yaml file.
You can enable Xdebug directly to all Starter environments and Pro Integration environments. For Pro Staging and Production, you need to update this file and enter a Support ticket to have it enabled. We enable Xdebug on those environments for you.
To enable Xdebug:
In your local terminal, open the .magento.app.yaml file in a text editor.
In the runtime section, under extensions, add xdebug. For example:
Save your changes to the .magento.app.yaml file and exit the text editor.
Add, commit, and push the changes to redeploy the environment.
When deployed to Starter environments and Pro Integration environments, Xdebug is now available. You should continue configuring your IDE. For PhpStorm, see Configure PhpStorm.
Configure PhpStorm
You need to configure PhpStorm to properly work with Xdebug.
To configure PhpStorm to work with Xdebug:
In your PhpStorm project, open the settings panel.
Mac OS X—Select PhpStorm > Preferences.
Windows/Linux—Select File > Settings.
In the Settings panel, expand and locate the Languages & Frameworks > PHP > Servers section.
Click the + to add a server configuration. The project name is in grey at the top.
Configure the following settings for the new server configuration:
Name—enter the same as the hostname. This value is used in and must match the value for PHP_IDE_CONFIG variable in Debug CLI commands.
Host—Enter localhost.
Port—Enter 80.
Debugger—Select Xdebug.
Select Use path mappings. In the File/Directory pane, the root of the project for the serverName displays.
In the Absolute path on the server column, click (Edit) and add a setting based on the environment:
For all Starter environments and Pro Integration environments, the remote path is /app.
For Pro Staging and Production environments:
Production: /app/<project_code>/
Staging: /app/<project_code>_stg/
Change the Xdebug port to 9000 in the Languages & Frameworks > PHP > Debug > Xdebug > Debug Port panel.
Click Apply.
Set up port forwarding
You must map the XDEBUG connection from the server to your local system. To do any type of debugging, you must forward port 9000 from your Magento Commerce Cloud server to your local machine. See one of the following sections:
Port forwarding on Mac or UNIX
To set up port forwarding on a Mac or in a Unix environment:
Open a terminal.
Use SSH to establish the connection.
Add the -v option to the SSH command to show in the terminal whenever a socket is connected to the port that is being forwarded.
If an “unable to connect” or “could not listen to port on remote” error is displayed, there could be another active SSH session persisting on the server that is occupying port 9000. If that connection isn’t being used, you can terminate it.
To troubleshoot the connection:
Use SSH to log in to the remote Integration, Staging, or Production environment.
Enter who to view a list of SSH sessions.
View existing SSH sessions by user. Be careful to not affect a user other than yourself!
Integration: usernames are similar to dd2q5ct7mhgus
Staging: usernames are similar to dd2q5ct7mhgus_stg
Production: usernames are similar to dd2q5ct7mhgus
For a user session that is older than yours, find the pseudo-terminal (PTS) value, such as pts/0.
Kill the process ID (PID) corresponding to the PTS value.
Sample response:
To terminate the connection, enter a kill command with the process ID (PID).
Port forwarding on Windows
To set up port forwarding (SSH tunneling) on Windows, you must configure your Windows terminal application. For this example, we walk through creating an SSH tunnel using Putty. You can use other applications such as Cygwin. For more information on other applications, see the vendor documentation provided with those applications.
To set up an SSH tunnel on Windows using Putty:
If you have not already done so, download Putty.
Start Putty.
In the Category pane, click Session.
Enter the following information:
Hostname (or IP address) field: Enter the SSH URL for your Cloud server
Port field: Enter 22
In the Category pane, click Connection > SSH > Tunnels.
Enter the following information:
Source port field: Enter 9000
Destination field: Enter 127.0.0.1:9000
Click Remote
Click Add.
In the Category pane, click Session.
In the Saved Sessions field, enter a name for this SSH tunnel.
Click Save.
To test the SSH tunnel, click Load, then click Open.
If an “unable to connect” error displays, verify all of the following:
All Putty settings are correct
You are running Putty on the machine on which your private Magento Commerce Cloud SSH keys are located
Configure Pro Staging and Production
To complete configuration for Pro plan Staging and Production environments, you must enter a Support ticket to have Xdebug enabled and configured in Staging and Production environments.
We enable Xdebug in the environment. Be aware that this is a configuration change that requires us to redeploy your Staging and Production environments.
SSH access to Xdebug environments
For initiating debugging, performing setup, and more, you need the SSH commands for accessing the environments. You can get this information, through the Project Web Interface and your project spreadsheet.
Xdebug Helper
For Starter environments and Pro Integration environments, you can use the following Magento Cloud CLI command to SSH into those environments:
To use Xdebug, SSH to the environment as follows:
For example,
Debug for Pro Staging and Production
To use Xdebug specifically on Pro plan Staging and Production environment, you create a separate SSH tunnel and web session only you have access to. This usage differs from typical access, only providing access to you and not to all users.

You need the following:
SSH commands for accessing the environments. You can get this information, through the Project Web Interface or your Cloud Onboarding UI.
The xdebug_key value we set when configuring the Staging and Pro environments
To set up an SSH tunnel to a Staging or Production environment:
Open a terminal.
Clean up all SSH sessions.
Set up the SSH tunnel for Xdebug.
To start debugging using the environment URL:
To enable remote debugging, visit the site in the browser with the following added to the URL where KEY is value for xdebug_key:
This sets the cookie that sends browser requests to trigger Xdebug.
Complete your debugging with Xdebug.
When you are ready to end the session, you can use the following command to remove the cookie and end debugging through the browser where KEY is value for xdebug_key:
The XDEBUG_SESSION_START passed by POST requests are not supported at this time.
Debug CLI commands
This section walks through debugging CLI commands.
To debug CLI commands:
SSH into the server you want to debug using CLI commands.
Create the following environment variables:
These variables are removed when the SSH session ends.
Begin debugging
On Starter environments and Pro Integration environments, run the CLI command to debug.You may add runtime options, for example:
On Pro Staging and Production environments, you must specify the path to the Xdebug php configuration file when debugging CLI commands, for example:
For debugging web requests
The following steps help you debug web requests.
On the Extension menu, click Debug to enable.
Right click, select the options menu, and set the IDE key to PHPSTORM.
Install the Xdebug client on the browser. Configure and enable it.
Example set up on Chrome
This section discusses how to use Xdebug in Chrome using the Xdebug Helper extension. For information about Xdebug tools for other browsers, consult the browser documentation.
To use Xdebug Helper with Chrome:
Create an SSH tunnel to the Cloud server.
Install the Xdebug Helper extension from the Chrome store.
Enable the extension in Chrome as shown in the following figure.
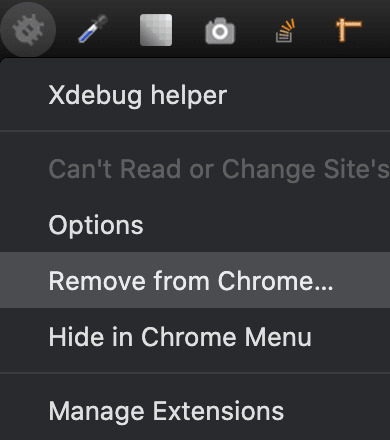
In Chrome, right-click in the Chrome toolbar.
From the pop-up menu, click Options.
From the IDE Key list, click PhpStorm.
Click Save.
Open your PhpStorm project.
In the top navigation bar, click (Start listening).
If the navigation bar isn’t displayed, click View > Navigation Bar.
In the PhpStorm navigation pane, double-click the PHP file to test.
Debug code locally
Due to the read-only environments, you need to pull code locally from an environment or specific Git branch to perform debugging.
The method you choose is up to you. You have the following options:
Check out code from Git and run composer install
This method works unless composer.json references packages in private repositories to which you do not have access. This method results in getting the entire Magento codebase.
Copy the vendor, app, pub, lib, and setup directories
This method results in your having all code you can possibly test. Depending on how many static assets you have, it could result in a long transfer with a large volume of files.
Copy the vendor directory only
Because most Magento and third-party code is in the vendor directory, this method is likely to result in good testing although you will not be testing the entire codebase.
To compress files and copy them to your local machine:
Use SSH to login to the remote environment.
Compress the files.
For example, to compress the vendor directory only, enter
On your local environment, use PhpStorm to compress the files.
After spending way more time that I should like to admit trying to get XDEBUG to work with Notepad++ using the DBGp plugin in anything but the simplest of projects, I decided to look for an alternative.
I compared features of 9 different IDE's for PHP development and reading tons of reviews. There are many great IDE's out there and everyone will have their favourite. My short list ended up including:
Eclipse (PDT) 3.5 -- Didn't bother trying it. While I'm sure it's a fine product, the website is ancient and not user friendly. Way too much work to try and find information. I'm not sure if it is even being developed anymore. PDT isn't even listed in their main list of downloads. Although I didn't try Eclipse (PDT), I did try Aptana which is built on Eclipse but I don't want to have to struggle to figure out the user interface… I want to code!
NetBeans 8 -- Way better user interface than Eclipse in my opinion. It did take me a little to figure out the XDEBUG integration but I got it to work exactly as I expected. My problem was part technology and part learning what I wanted to do in NetBeans which was to initiate the debugging session from within my web browser without having to modify the URL.
Although both of these are free, I would not have minded paying for an IDE for PHP development since I do a fair amount of this for a living. Some of the try before you buy contenders included PhpStorm 7.13 and PHPDesigner 8.1.2.
They all have similar sets of features. PHPDesigner is even a native Windows app which is why I might still consider it.
I decided to give NetBeans a try. There are tons of stories on the Net from developers switching from Eclipse to NetBeans but very few going in the other direction. It includes almost all of the features I regularly use and plugins to fill in the gap. What was it missing? Like many of the cross-platform IDE's, it's a Java application which means it is slower than it could be on Windows. I also wish it had Timed Backups feature like in Notepad++.
Assuming you've downloaded and installed NetBeans, here's how to get it to work with XDEBUG:
Step 1 -- Configure PHP to work with XDEBUG
Modify your php.ini file. Start by commenting out anything that refers to ZEND… by adding a semi-colon in front (to the left) of the line. Zend is not compatible with XDEBUG.
Next comment out everything under the (xdebug) section. Then add the following, making sure to modify the lines that refer to your XAMPP path (doesn't work with the Lite version).
For 64-bit WAMP, the lines would be:
As you can see, the actual filename and location for the php_xdebug.dll file may vary. Check the ext or zend_ext folder to get the correct name for your version of AMP. If your version of AMP did not come with XDEBUG, Follow the instructions found on the XDEBUG Installation Wizard page.
Save your changes and restart Apache.
Step 2- Configure NetBeans to work with XDEBUG
The following instructions are for NetBeans 8 but it should be fairly similar with other versions:
Open your project in NetBeans. If you don't have one yet, create one.
Click Tools > Options > PHP.
Click the Debugging tab and make sure that:
Debugger port: 9000.
Session ID: netbeans-xdebug
Maximum Data Length: 2048
None of the checkboxes are checked.
Click OK.
Click File > Project Properties > Run Configuration > Advanced button.
Select Do Not Open Web Browser and click OK twice.
Important: You will need to repeat these last two steps anytime you create a new project.
You may need to close and restart NetBeans for the changes to take effect as I discovered that they don't always take effect right away when you save.
That's it. It should now be configured and ready to use. Next we will XDEBUG enable your web browser.
Importing Existing Source Code into NetBeans
Creating a new NetBeans project from an existing source code folder/files is easy. The following instructions describe how to create a new NetBeans project using existing source code and without storing NetBeans' own project files in your original source code directory tree. Looks like a lot of steps but it only takes about a minute to complete.
Click File > New Project.
For the Category, select the PHP.
For the Projects, select PHP Application with Existing Sources.
Click Next.
Specify the path to the Source Folder. This is where you source code currently exists.
Specify a project name. This can be anything as long as it is different from other existing NetBeans projects you might have.
Specify the version of PHP you will be using. If you aren't sure, type the following at a Command prompt or verify your log files: php --version . If PHP isn't in your path, you may need to change to the directory where the PHP.exe application is located.
The default UTF-8 should be correct for most situations.
To prevent NetBeans from storing it's files in your source code directory, check the 'Put NetBeans metadata into a separate directory' box and specify the folder where these files should be stored.
Click Next.
For Run As:, select Local Web Site (running on local web server) if it is not already selected.
Project URL should be the path to the localhost that corresponds to source directory specified above. It typically looks like http://localhost/ and may include a folder name if your local website is not in the root of the server.
For PHP, the default index file is typically called index.php unless you've changed it.
DO NOT check the 'Copy files from Source Folder to another location' checkbox if you want to work on your files where they currently reside.
Click Finish.
NetBeans will then create the project and open the default file.
Enabling XDEBUG in Web Browsers
Chrome
There are two really useful plugins for Chrome that you should install:
XDEBUG Helper -- This will enable you to turn XDEBUG on and off from your web browser without having to modify the URL. This is essential when debugging a POST type form submission where you can't just enter a URL.
XDEBUG Output Toggler -- This extension allows you to toggle the visibility of the extremely useful stack trace messages for your PHP.
Firefox
There are also two really useful plugins for Firefox that you should install (to be tested):
easyXdebug or The easiest Xdebug -- This will enable you to turn XDEBUG on and off from your web browser without having to modify the URL. This is essential when debugging a POST type form submission where you can't just enter a URL. I don't recommend installing both of these add-ons as they might conflict with each other since they do the same function.
XDEBUG Error Togger -- This is the same as XDEBUG Output Togger for Chrome. It allows you to toggle the visibility of the extremely useful stack trace messages for your PHP.
Internet Explorer
Unfortunately I don't know of any integration tools that work with IE. If you know if any, leave a comment below. You'll always be able to debug by appending ?XDEBUG_SESSION_START=netbeans-xdebug to the URL
Using XDEBUG in NetBeans
Open your project.
Debugging a Project: Right-click on the project you want to debug. Then click on Debug to start the debugger. There is a Debug Project icon at the top of the editor that you could use however it will not work for debugging a specific file. Debugging a specific file in a project or standalone file: Right-click on the file either in the navigation pane or even in the source code itself and then click Debug. If the file is already open, right click anywhere in the editor window and select Debug.
Set a breakpoint by clicking on the line number in the margin. Otherwise your code will be executed from start to end and nothing will happen in debugger.
Switch to your web browser and load the page you want to debug.
Click the add-on/plugin icon to enable Xdebug in your browser.
Reload the page you want to debug and switch back to NetBeans. You should now notice that the execution of the code has paused where you set the breakpoint above.
You can now use the debugging controls in the toolbar to step over, step into, step out, run to cursor, run, and stop debugging.
Xdebug Chrome Extension
You may notice that your PHP code runs slower when debugging. This is perfectly normal and a good reason to have a fast computer. On the positive side, you'll really notice where the slower parts of your code are.
Troubleshooting
If you can't get it to work, check to make sure that your timezone is properly set in /xampp/php/php.ini. I'm not sure why but it made a difference for me. It will also make dates appear correctly on your website.
Chrome Xdebug Not Working
(Date) ; Defines the default timezone used by the date functions ; Find the value for your location by visiting http://php.net/date.timezone date.timezone = America/Toronto
Xdebug Chrome How To Use
Related Posts:
0 notes
Text
What is Docker CE ? | learn how to install Dockers
What is docker
Docker is a computer program which is used to provide a running environment to run all kinds of application which are in docker hub, or created in docker. It creates an image of your application and stores all requirements of files into the container. Whenever we want to run docker application in any system, we have to run a single file without providing any other requirements.
Docker is easy to use in Ubuntu. It also supports Window and Mac operating system. For windows, it runs in Windows10/enterprise only. To use in Windows7/8/8.1 or Windows10 home should use docker toolbox.
There are two kind of docker software for programmers.
Docker CE :- Free community edition :- This is an open source software.
Docker EE :- Docker Enterprise Edition :- This is a paid software design for enterprise development and IT teams who build, ship, and run business-critical applications in production.
Requirements :-
Operating system (ubuntu)
Docker
Steps to install docker . Steps to download docker in ubuntu. 1. Open terminal and follow these command to install docker.
Just type docker and check if docker is in your system or not. $ docker
2. To check the version of operating system. To install Docker CE, we need the 64-bit version of one of these Ubuntu versions: 1. Cosmic 18.10 2. Bionic 18.04 (LTS) 3. Xenial 16.04 (LTS) $ lsb_release -a
3. Update the apt package index. $ sudo apt-get update
4. If requires, then install. $ sudo apt-get install
5. If docker is not in your system then install it. $ sudo apt-get install docker.io
6. Now check the staus of docker. $ sudo systemctl status docker
Steps to add user in docker 1. Why sudo :- We have to use 'sudo' command to run docker commands because docker container run user 'root'. We have to join the docker group, when your system join the docker group after that one can run docker command without sudo.
2. 'USER' is your system name, commands to add user as listed below. $user will pick system user 1. $ sudo groupadd docker 2. $ sudo gpasswd -a $USER 3. $ newgrp docker
3. Second way to add user in docker group. 1. $ sudo groupadd docker 2. $ sudo usermod -aG docker $USER
4. After adding a 'USER' into the docker group, we have to shut down or restart so that we can run docker commands without 'sudo'.
5. Command to uninstall docker. $ sudo apt-get remove docker docker-engine docker.io containerd runc
Docker commands 1.To check Docker version $ docker --version
2. To check Docker and containers info $ docker info
3. Find out which users are in the docker group and who is allowed to start docker containers. 1. $ getent group sudo
2. $ getent group docker
4. 'pull' command fetch the 'name_of_images' image from the 'Docker registry' and saves it to our system. $ docker pull busybox (busybox is name of image)
5. You can use the 'docker images' command to see a list of all images on your system. $ docker images
6. To find the location of the images in the system we need to follow some commands:- $ docker info path of docker:- "Docker Root Dir: /var/lib/docker"
Commands to check the images:-
$ cd /var/lib/docker
$ ls
pardise@pardise-MS-7817:/var/lib/docker$ cd image
bash: cd: image: Permission denied
Permission denied for all users
$ sudo su
$ root@pardise-MS-7817:/var/lib/docker# ls
Now docker info command will provide all details about images and containers
$root@pardise-MS-7817:/var/lib/docker/image/overlay2# docker info
7. Now run a Docker container based on this image. When you call run, the Docker client finds the image (busybox in this case), loads up the container and then runs a command in that container. $ docker run busybox
8. Now Docker client ran the 'echo' command in our busybox container and then exited it. $docker run busybox echo "hello from busybox"
9. Command to shows you all containers that are currently running. $ docker ps
10. List of all containers that one can run. Do notice that the STATUS column shows that these containers exited a few minutes ago. $ docker ps -a CONTAINER ID – Unique ID given to all the containers. IMAGE – Base image from which the container has been started. COMMAND – Command which was used when the container was started CREATED – Time at which the container was created. STATUS – The current status of the container (Up or Exited). PORTS – Port numbers if any, forwarded to the docker host for communicating with the external world. NAMES – It is a container name, you can specify your own name.
11. To start Container $ docker start (container id)
12. To login in Container $ docker attach (container id)
13. To stop container $ docker stop (container id)
Difference between images and containers
Docker Image is a set of files which has no state, whereas Docker Container is the abstract of Docker Image. In other words, Docker Container is the run time instance of images.
Remove images and containers 1. Docker containers are not automatically removed, firstly stop them, then can use docker rm command. Just copy the container IDs. $ docker rm 419600f601f9 (container_id)
2. Command to deletes all containers that have a status of exited. -q flag, only returns the numeric IDs and -f filters output based on conditions provided. $ docker rm $(docker ps -a -q -f status=exited)
3. Command to delete all container. $ docker container prune
4. Command to delete all images. To remove all images which are not referenced by any existing container, not just dangling ones, use the -a flag: $ docker images prune -a
dangling image is an image that is not tagged and is not used by any container. To remove dangling images type:-
$ docker images prune
$ docker rmi image_id image_id......
5. Removing all Unused Objects. It will remove all stopped containers,all dangling images,and all unused network. To remove all images which are not referenced by any existing container, use the -a flag: $ docker system prune -a
You can follow us and our codes at our github repository: https://github.com/amit-kumar001/You can follow us and our codes at our github
#What is docker#learn how to install Dockers#Steps to install docker#Difference between images and containers
0 notes
Text
Scaling ProxySQL rapidly in Kubernetes
Editor’s Note: Because our bloggers have lots of useful tips, every now and then we update and bring forward a popular post from the past. Today’s post was originally published on November 26, 2019. It’s not uncommon these days for us to use a high availability stack for MySQL consisting of Orchestrator, Consul and ProxySQL. You can read more details about this stack by reading Matthias Crauwels’ blog post How to Autoscale ProxySQL in the Cloud as well as Ivan Groenwold’s post on MySQL High Availability With ProxySQL, Consul and Orchestrator. The high-level concept is simply that Orchestrator will monitor the state of the MySQL replication topology and report changes to Consul which in turn can update ProxySQL hosts using a tool called consul-template. Until now we’ve typically implemented the ProxySQL portion of this stack using an autoscaling group of sorts due to the high levels of CPU usage that can be associated with ProxySQL. It’s better to be able to scale up and down as traffic increases and decreases. This ensures you’re not paying for resources you don’t need. This, however, comes with a few disadvantages. The first is the amount of time it takes to scale up. If you’re using an autoscaling group and it launches a new instance it will need to take the following steps: There will be a request to your cloud service provider for a new VM instance. Once the instance is up and running as part of the group, it will need to install ProxySQL along with supporting packages such as consul (agent) and consul-template. Once the packages are installed, they’ll need to be configured to work with the consul server nodes as well as the ProxySQL nodes that are participating in the ProxySQL cluster. The new ProxySQL host will announce to Consul that it’s available, which in turn will update all the other participating nodes in the ProxySQL cluster. This can take time. Provisioning a new VM instance usually happens fairly quickly — normally within a couple of minutes — but sometimes there can be unexpected delays. You can speed up package installation by using a custom machine image, but since there’s an operational overhead with keeping images up to date with the latest versions of the installed packages, it may be easier to do this using a script that always installs the latest versions. All in all, you can expect a scale-up to take more than a minute. The next issue is how deterministic this solution is. If you’re not using a custom machine image, you’ll need to pull down your config and template files from somewhere — most likely a storage bucket — and there’s a chance those files could be overwritten. This means the next time the autoscaler launches an instance it may not necessarily have the same configuration as the rest of the hosts participating in the ProxySQL cluster. We can take this already impressive stack and go a step further using Docker containers and Kubernetes. For those unfamiliar with containerization; a container is similar to a virtual machine snapshot but isn’t a full snapshot that would include the OS. Instead, it contains just the binary that’s required to run your process. You create this image using a Dockerfile; typically starting from a specified Linux distribution, then using verbs like RUN, COPY and USER to specify what should be included in your container “image.” Once this image is constructed, it can be centrally located in a repository and made available for usage by machines using a containerization platform like Docker. This method of deployment has become more and more popular in recent years due to the fact that containers are lightweight, and you know that if the container works on one system it will work exactly the same way when it’s moved to a different system. This reduces common issues like dependencies and configuration variations from host to host. Given that we want to be able to scale up and down, it’s safe to say we’re going to want to run more than one container. That’s where Kubernetes comes into play. Kubernetes is a container management platform that operates on an array of hosts (virtual or physical) and distributes containers on them as specified by your configuration; typically a YAML-format Kubernetes deployment file. If you’re using Google Kubernetes Engine (GKE) on Google Cloud Platform (GCP), this is even easier as the vast majority of the work in creating a Kubernetes deployment (referred to as a ‘workload’ in GKE) YAML is handled for you via a simple UI within the GCP Console. If you want to learn more about Docker or Kubernetes, I highly recommend Nigel Poulton’s video content on Pluralsight. For now, let’s stick to learning about ProxySQL on this platform. If we want ProxySQL to run in Kubernetes and operate with our existing stack with Consul and Orchestrator, we’re going to need to keep best practices in mind for our containers. Each container should run only a single process. We know we’re working with ProxySQL, consul (agent), and consul-template, so these will all need to be in their own containers. The primary process running in each container should run as PID 1. The primary process running in each container should not run as root. Log output from the primary process in the container should be sent to STDOUT so that it can be collected by Docker logs. Containers should be as deterministic as possible — meaning they should run the same (or at least as much as possible) regardless of what environment they are deployed in. The first thing in the list above that popped out is the need to have ProxySQL, consul-template and consul (agent) isolated within their own containers. These are going to need to work together given that consul (agent) is acting as our communication conduit back to consul (server) hosts and consul-template is what updates ProxySQL based on changes to keys and values in Consul. So how can they work together if they’re in separate containers? Kubernetes provides the solution. When you’re thinking about Docker, the smallest computational unit is the container; however, when you’re thinking about Kubernetes, the smallest computational unit is the pod which can contain one or more containers. Any containers operating within the same pod can communicate with one another using localhost ports. So in this case, assuming you’re using default ports, the consul-template container can communicate to the consul (agent) container using localhost port 8500, and it can communicate to the ProxySQL container using port 6032 given that these three containers will be working together in the same pod. So let’s start looking at some code, starting with the simplest container and working our way to the most complex. Consul (Agent) Container Below is a generic version of the Dockerfile I’m using for consul (agent). The objective is to install Consul then instruct it to connect as an agent to the Consul cluster comprised of the consul (server) nodes. FROM centos:7 RUN yum install -q -y unzip wget && yum clean all RUN groupadd consul && useradd -r -g consul -d /var/lib/consul consul RUN mkdir /opt/consul && mkdir /etc/consul && mkdir /var/log/consul && mkdir /var/lib/consul && chown -R consul:consul /opt/consul && chown -R consul:consul /etc/consul && chown -R consul:consul /var/log/consul && chown -R consul:consul /var/lib/consul RUN wget -q -O /opt/consul/consul.zip https://releases.hashicorp.com/consul/1.6.1/consul_1.6.1_linux_amd64.zip && unzip /opt/consul/consul.zip -d /opt/consul/ && rm -f /opt/consul/consul.zip && ln -s /opt/consul/consul /usr/local/bin/consul COPY supportfiles/consul.conf.json /etc/consul/ USER consul ENTRYPOINT ["/usr/local/bin/consul", "agent", "--config-file=/etc/consul/consul.conf.json"] Simply put, the code above follows these instructions: Start from CentOS 7. This is a personal preference of mine. There are probably more lightweight distributions that can be considered, such as Alpine as recommended by Google, but I’m not the best OS nerd out there so I wanted to stick with what I know. Install our dependencies, which in this case are unzip and wget. Create our consul user, group and directory structure. Install consul. Copy over the consul config file from the host where the Docker build is being performed. Switch to the consul user. Start consul (agent). Now let’s check the code and see if it matches best practices. Container runs a single process: The ENTRYPOINT runs Consul directly, meaning nothing else is being run. Keep in mind that ENTRYPOINT specifies what should be run when the container starts. This means when the container starts it won’t have to install anything because the packages come with the image as designated by the Dockerfile, but we still need to launch Consul when the container starts. Process should be PID 1: Any process run by ENTRYPOINT will run as PID 1. Process should not be run as root: We switched to the Consul user prior to starting the ENTRYPOINT. Log output should go to STDOUT: If you run Consul using the command noted in the ENTRYPOINT, you’ll see log output goes to STDOUT. Should be as deterministic as possible: We’ve copied the configuration file into the container, meaning the container doesn’t have to get support files from anywhere else before Consul starts. The only way the nature of Consul will change is if we recreate the container image with a new configuration file. There’s really nothing special about the Consul configuration file that gets copied into the container. You can see an example of this by checking the aforementioned blog posts by Matthias or Ivan for this particular HA stack. ProxySQL Container Below is a generic version of the Dockerfile I’m using for ProxySQL. The objective is to install ProxySQL and make it available to receive traffic requests on 6033 for write traffic, 6034 for read traffic and 6032 for the admin console which is how consul-template will interface with ProxySQL. FROM centos:7 RUN groupadd proxysql && useradd -r -g proxysql proxysql RUN yum install -q -y https://github.com/sysown/proxysql/releases/download/v2.0.6/proxysql-2.0.6-1-centos67.x86_64.rpm mysql curl && yum clean all COPY supportfiles/* /opt/supportfiles/ COPY startstop/* /opt/ RUN chmod +x /opt/entrypoint.sh RUN chown proxysql:proxysql /etc/proxysql.cnf USER proxysql ENTRYPOINT ["/opt/entrypoint.sh"] Simply put, the code above follows these instructions: Start from CentOS 7. Create our ProxySQL user and group. Install ProxySQL and dependencies, which in this case is curl, which will be used to poll the GCP API in order to determine what region the ProxySQL cluster is in. We’ll cover this in more detail below. Move our configuration files and ENTRYPOINT script to the container. Make sure the ProxySQL config file is readable by ProxySQL. Switch to the ProxySQL user. Start ProxySQL via the ENTRYPOINT script provided with the container. In my use case, I have multiple ProxySQL clusters — one per GCP region. They have to be logically grouped together to ensure they route read traffic to replicas within the local region but send traffic to the master regardless of what region it’s in. In my solution, a hostgroup is noted for read replicas in each region, so my mysql_query_rules table needs to be configured accordingly. In my solution, the MySQL hosts will be added to different host groups, but the routing to each hostgroup will remain consistent. Given that it’s highly unlikely to change, I have mysql_query_rules configured in the configuration file. This means I need to select the correct configuration file based on my region before starting ProxySQL, and this is where my ENTRYPOINT script comes into play. Let’s have a look at a simplified and more generic version of my code: #!/bin/bash dataCenter=$(curl https://metadata.google.internal/computeMetadata/v1/instance/zone -H "Metadata-Flavor: Google" | awk -F "/" '{print $NF}' | cut -d- -f1,2) ... case $dataCenter in us-central1) cp -f /opt/supportfiles/proxysql-us-central1.cnf /etc/proxysql.cnf ;; us-east1) cp -f /opt/supportfiles/proxysql-us-east1.cnf /etc/proxysql.cnf ;; esac ... exec proxysql -c /etc/proxysql.cnf -f -D /var/lib/proxysql The script starts by polling the GCP API to determine what region the container has been launched in. Based on the result, it will copy the correct config file to the appropriate location, then start ProxySQL. Let’s see how the combination of the Dockerfile and the ENTRYPOINT script allows us to meet best practices. Container runs a single process: ENTRYPOINT calls the entrypoint.sh script, which does some conditional logic based on the regional location of the container, then ends by running ProxySQL. This means at the end of the process ProxySQL will be the only process running. Process should be PID 1: The command “exec” at the end of the ENTRYPOINT script will start ProxySQL as PID 1. Process should not be run as root: We switched to the ProxySQL user prior to starting the ENTRYPOINT. Log output should go to STDOUT: If you run ProxySQL using the command noted at the end of the ENTRYPOINT script you’ll see that log output goes to STDOUT. Should be as deterministic as possible: We’ve copied the potential configuration files into the container. Unlike Consul, there are multiple configuration files and we need to determine which will be used based on the region the container lives in, but the configuration files themselves will not change unless the container image itself is updated. This ensures that all containers running within the same region will behave the same. Consul-template container Below is a generic version of the Dockerfile I’m using for consul-template. The objective is to install consul-template and have it act as the bridge between Consul via the consul (agent) container and ProxySQL; updating ProxySQL as needed when keys and values change in Consul. FROM centos:7 RUN yum install -q -y unzip wget mysql nmap-ncat curl && yum clean all RUN groupadd consul && useradd -r -g consul -d /var/lib/consul consul RUN mkdir /opt/consul-template && mkdir /etc/consul-template && mkdir /etc/consul-template/templates && mkdir /etc/consul-template/config && mkdir /opt/supportfiles && mkdir /var/log/consul/ && chown -R consul:consul /etc/consul-template && chown -R consul:consul /etc/consul-template/templates && chown -R consul:consul /etc/consul-template/config && chown -R consul:consul /var/log/consul RUN wget -q -O /opt/consul-template/consul-template.zip https://releases.hashicorp.com/consul-template/0.22.0/consul-template_0.22.0_linux_amd64.zip && unzip /opt/consul-template/consul-template.zip -d /opt/consul-template/ && rm -f /opt/consul-template/consul-template.zip && ln -s /opt/consul-template/consul-template /usr/local/bin/consul-template RUN chown -R consul:consul /opt/consul-template COPY supportfiles/* /opt/supportfiles/ COPY startstop/* /opt/ RUN chmod +x /opt/entrypoint.sh USER consul ENTRYPOINT ["/opt/entrypoint.sh"] Simply put, the code above follows these instructions: Start from CentOS 7. Install our dependencies which are unzip, wget, mysql (client), nmap-ncat and curl. Create our Consul user and group. Create the consul-template directory structure. Download and install consul-template. Copy the configuration file, template files and ENTRYPOINT script to the container. Make the ENTRYPOINT script executable. Switch to the Consul user. Start consul-template via the ENTRYPOINT script that’s provided with the container. Much like our ProxySQL container, we really need to look at the ENTRYPOINT here in order to get the whole story. Remember, this is multi-region so there is additional logic that has to be considered when working with template files. #!/bin/bash dataCenter=$(curl https://metadata.google.internal/computeMetadata/v1/instance/zone -H "Metadata-Flavor: Google" | awk -F "/" '{print $NF}' | cut -d- -f1,2) ... cp /opt/supportfiles/consul-template-config /etc/consul-template/config/consul-template.conf.json case $dataCenter in us-central1) cp /opt/supportfiles/template-mysql-servers-us-central1 /etc/consul-template/templates/mysql_servers.tpl ;; us-east1) cp /opt/supportfiles/template-mysql-servers-us-east1 /etc/consul-template/templates/mysql_servers.tpl ;; esac cp /opt/supportfiles/template-mysql-users /etc/consul-template/templates/mysql_users.tpl ### Ensure that proxysql has started while ! nc -z localhost 6032; do sleep 1; done ### Ensure that consul agent has started while ! nc -z localhost 8500; do sleep 1; done exec /usr/local/bin/consul-template --config=/etc/consul-template/config/consul-template.conf.json This code is very similar to the ENTRYPOINT file used for ProxySQL in the sense that it checks for the region the container is in, then moves configuration and template files into the appropriate location. However, there is some additional logic here that checks to ensure that ProxySQL is up and listening on 6032 and that consul (agent) is up and listening on port 8500. The reason for this is the consul-template needs to be able to communicate with both these hosts. You really have no assurance as to what container is going to load in what order in a pod, so to avoid excessive errors in the consul-template log, I have it wait until it knows that its dependent services are running. Let’s go through our best practices checklist one more time against our consul-template container code. Container runs a single process: ENTRYPOINT calls the entrypoint.sh script, which does some conditional logic based on the regional location of the container, then ends by running consul-template. This means at the end of the process consul-template will be the only process running. Process should be PID 1: The command “exec” at the end of the ENTRYPOINT script will start consul-template as PID 1. Process should not be run as root: We switched to the consul user prior to starting the ENTRYPOINT. Log output should go to STDOUT: If you run Consul using the command noted at the end of the ENTRYPOINT script, you’ll see log output goes to STDOUT. Should be as deterministic as possible: Just like ProxySQL and consul (agent), all the supporting files are packaged with the container. Yes, there is logic to determine what files should be used, but you have the assurance that the files won’t change unless you create a new version of the container image. Putting it all together Okay, we have three containers representing the three processes we need to package together so ProxySQL can work as part of our HA stack. Now we need to put it all together in a pod so Kubernetes can have it run against our resources. In my use case, I’m running this on GCP, meaning once my containers have been built they’re going to need to be pushed up to the Google Container Registry. After this we can create our workload to run our pod and specify how many pods we want to run. Getting this up and running can be done with just a few short and simple steps: Create a Kubernetes cluster if you don’t already have one. This is what provisions the Cloud Compute VMs the pods will run on. Push your three Docker images to the Google container registry. This makes the images available for use by the Kubernetes engine. Create your Kubernetes workload, which can be done simply via the user interface in the GCP console. All that’s required is selecting the latest version of the three containers you’ve pushed up to the registry, optionally applying some metadata like an application name, Kubernetes namespace, and labels, then selecting which cluster you want to run the workload on. Once you click deploy, the containers will spin up and, assuming there are no issues bringing the containers online, you’ll quickly have a functioning ProxySQL pod in Kubernetes that follows these high-level steps: The pod is started. The three containers will start. In Kubernetes, pods are fully atomic. All the containers start without error or the pod will not consider itself started. The consul-template container will poll consul (agent) and ProxySQL on their respective ports until it’s confirmed those processes have started, then consul-template will start. Consul-template will create the new SQL files meant to configure ProxySQL based on the contents of the Consul key / value store. Consul-template will run the newly created SQL files against ProxySQL via its admin interface. The pod is now ready to receive traffic. The YAML During the process of creating your workload, or even after the fact, you’ll be able to see the YAML you’d normally have to create with standard Kubernetes deployments. Let’s have a look at the YAML that was created for my particular deployment. apiVersion: apps/v1 kind: Deployment metadata: annotations: deployment.kubernetes.io/revision: "1" creationTimestamp: "2019-10-16T15:41:37Z" generation: 64 labels: app: pythian-proxysql env: sandbox name: pythian-proxysql namespace: pythian-proxysql resourceVersion: "7516809" selfLink: /apis/apps/v1/namespaces/pythian-proxysql/deployments/pythian-proxysql uid: 706c6284-f02b-11e9-8f3e-42010a800050 spec: minReadySeconds: 10 progressDeadlineSeconds: 600 replicas: 2 revisionHistoryLimit: 10 selector: matchLabels: app: pythian-proxysql env: sandbox strategy: rollingUpdate: maxSurge: 100% maxUnavailable: 25% type: RollingUpdate template: metadata: creationTimestamp: null labels: app: pythian-proxysql env: sandbox spec: containers: - image: gcr.io/pythian-proxysql/pythian-proxysql-proxysql@sha256:3ba95101eb7a5aac58523e4c6489956869865452d1cbdbd32b4186a44f2a4500 imagePullPolicy: IfNotPresent name: pythian-proxysql-proxysql-sha256 resources: {} terminationMessagePath: /dev/termination-log terminationMessagePolicy: File - image: gcr.io/pythian-proxysql/pythian-proxysql-consul-agent@sha256:7c66fa5e630c4a0d70d662ec8e9d988c05bd471b43323a47e240294fc00a153d imagePullPolicy: IfNotPresent name: pythian-proxysql-consul-agent-sha256 resources: {} terminationMessagePath: /dev/termination-log terminationMessagePolicy: File - image: gcr.io/pythian-proxysql/pythian-proxysql-consul-template@sha256:1e70f4b96614dfd865641bf75784d895a794775a6c51ce6b368387591f3f1918 imagePullPolicy: IfNotPresent name: pythian-proxysql-consul-template-sha256 resources: {} terminationMessagePath: /dev/termination-log terminationMessagePolicy: File dnsPolicy: ClusterFirst restartPolicy: Always schedulerName: default-scheduler securityContext: {} terminationGracePeriodSeconds: 30 status: availableReplicas: 2 collisionCount: 1 conditions: - lastTransitionTime: "2019-10-16T15:41:37Z" lastUpdateTime: "2019-11-11T15:56:55Z" message: ReplicaSet "pythian-proxysql-8589fdbf54" has successfully progressed. reason: NewReplicaSetAvailable status: "True" type: Progressing - lastTransitionTime: "2019-11-11T20:41:31Z" lastUpdateTime: "2019-11-11T20:41:31Z" message: Deployment has minimum availability. reason: MinimumReplicasAvailable status: "True" type: Available observedGeneration: 64 readyReplicas: 2 replicas: 2 updatedReplicas: 2 The first thing I have to point out is this is a LOT of YAML that we didn’t have to create given the Google Kubernetes Engine handled all of it. This is a huge part of easing the process which allows us to get our solution working so quickly. However, despite the fact that we have a lot of YAML created for us, there are still some occasions where we may need to modify this manually, such as working with Kubernetes Container Lifecycle Hooks, or working with requests or limits for hardware resources for individual containers in our pod. How do I access my ProxySQL instance? One consideration for Kubernetes is when pods are started and stopped they’ll get an ephemeral IP address, so you don’t want to have your applications connect to your pods directly. Kubernetes has a feature called a “service” that allows your pods to be exposed via a consistent network interface. This service can also handle load balancing, which is what I’m planning on using with my Kubernetes deployment. Adding a service to your GKE workload is very simple and can be added with a few clicks. Autoscaling As noted earlier in this post, before the implementation of Kubernetes for this solution, it was recommended to use cloud compute autoscaling groups to handle fluctuations in traffic. We want to include the same strategy with Kubernetes to ensure we have enough pods available to handle traffic demand. Including autoscaling in your workload is also fairly simple and can be done via the console UI. One important thing to note about scaling with Kubernetes is the time it takes to scale up and down. In the intro section of this post, I noted the process of adding and removing nodes from an autoscaling group and how that can take minutes to achieve depending on how quickly your cloud provider can stand up a new instance and the complexity of your configuration. With Kubernetes, I’ve seen my pods scale up in as little as three seconds and scale down in less than one second. This is part of what makes this solution so powerful. Considerations for Connections During Scale-Up and Down One important thing to note is, as the workload gains and loses pods, your connections to ProxySQL via the exposed service can be interrupted. The autoscaling documentation notes that this can cause disruption and your application needs to be able to handle this in much the same way it would have to for a cloud compute autoscaling group. You’ll want to ensure that your application has retry on database failure logic built in before incorporating Kubernetes autoscaling (or any autoscaling for that matter) as part of your data platform. Considerations for MySQL users in ProxySQL Three tables are replicated when working with ProxySQL cluster: mysql_servers, mysql_query_rules and mysql_users — meaning when a change to any of these tables is made on one of the nodes in the cluster, it will be replicated to all the other nodes. We really don’t need to worry about this when working with mysql_servers given that all nodes will get their mysql_server information from Consul via consul-template, so I’ve disabled this clustering feature. With my particular use case I don’t need to worry about mysql_query_rules either because, as noted earlier in this post, my traffic is being routed based on the port that traffic is being sent to. The rules for this are simple, and should not change, so I have it in the configuration file and I have disabled replicating this table, as well. The last table to consider is mysql_users and this is where things get interesting. Remember with Kubernetes it’s possible to have persistent storage, but we really want our containers to be as stateless as possible, so if we were to follow the Docker and Kubernetes philosophy as closely as possible we wouldn’t want to have our data persist. This falls into the whole cattle vs pets discussion when working with containers, but I digress. Let’s assume we’ve opted NOT to persist our ProxySQL data, typically stored in SQLite, and we lose all the pods in our Kubernetes cluster. It’s unlikely, but we always need to be ready for disaster. When the first pod comes up, it’s starting with a blank slate and this isn’t a problem considering it will get its initial set of mysql_server data from Consul via consul-template and its mysql_query_rules data from the config file. However, there is no source of truth for mysql_users data, so all that data would be lost. In this case, we need to incorporate some source of truth for the ProxySQL mysql_users table. It’s possible to use a cloud compute VM with ProxySQL installed to be an ever-present member of the cluster which could seed data for new joining pods. However, that breaks our construct of working specifically with containers. Plus, if you have a multi-cluster configuration like I do, where there’s one cluster in each region, you need one ProxySQL “master host” in each region. This is a bit of a waste considering it’s just acting as a source of truth for mysql_users, which likely will be the same across all clusters. My solution, in this case, is to leverage the source of truth we already have in place: Consul. If it’s already acting as a source of truth for mysql_servers, there’s no reason it can’t act as a source of truth for this as well. All I need is to have my MySQL users and password hashes (always stay secure) in Consul. I can then use consul-template to create these on new ProxySQL host, or change them as keys and values change. You may have noticed this in the ENTRYPOINT script in my consul-template container. To Cluster or Not To Cluster? I mentioned before that ProxySQL cluster handles the replication of three tables: mysql_users, mysql_query_rules and mysql_servers. Considering all three of these tables now have their own source of truth, we really don’t need to worry about replicating this data. As Consul receives change reports, it will update all the ProxySQL pods considering that all of them have consul (agent) and consul-template containers as part of the pod. With this in mind, I’ve opted to rely on my constructed sources of truth and reduce solution complexity by removing ProxySQL clustering; however, this is going to vary from use case to use case. Conclusion The solution implemented in this use case has required the inclusion of a lot of new technologies that MySQL DBAs may or may not have familiarity with: ProxySQL, Orchestrator, Consul, GTIDs, etc. We’ve made this solution a little more complex by adding Docker and Kubernetes to the stack, but I personally believe this complexity is worth it considering the higher degree of idempotency that is built into the solution, the lack of need for ProxySQL clustering and the speed in which scale-up and scale-down occurs. One last consideration is the simple need for learning how to incorporate containers into your stack. This is not my first blog post on container philosophy and implementation. I believe containers are going to become a greater part of the landscape for all of us — even us, the database professionals with our highly stateful technological challenges. If you haven’t already started educating yourself on these technologies, I would highly encourage you to do so to better prepare yourself for the shift from “Database Administrator” to “Database Reliability Engineer.” https://blog.pythian.com/proxysql-in-kubernetes/
0 notes
Text
Introducing rosetta-bitcoin: Coinbase’s Bitcoin implementation of the Rosetta API
By Patrick O’Grady
In June, we launched Rosetta as an open-source specification that makes integrating with blockchains simpler, faster, and more reliable. There are now 20+ blockchain projects working on a Rosetta implementation (Near, Cardano, Celo, Coda, Neo, Tron, Handshake, Oasis, Cosmos, Decred, Filecoin, Ontology, Sia, Zilliqa, Digibyte, Harmony, Kadena, Nervos, and Blockstack), five in-progress SDKs (Golang, JavaScript, TypeScript, Java, and Rust), and eight teams have made contributions to at least one of the Rosetta repositories on GitHub (rosetta-specifications, rosetta-sdk-go, and rosetta-cli).
Today, we are sharing a key contribution to this growing collection of implementations: rosetta-bitcoin.
Why Bitcoin?
Bitcoin is the bellwether for all of crypto, is the most popular blockchain, has the largest market capitalization, and most blockchain developers know how it works (so it is easier to understand how Rosetta can be implemented for other blockchains).
On another note, the reference implementation for Bitcoin (known as Bitcoin Core) doesn’t provide native support for many of the features integrators want. It is not possible to query account balances and/or UTXOs for all accounts, serve preprocessed blocks to callers so they don’t need to fetch all inputs to parse a transaction, nor to construct transactions without importing private keys onto the node (which isn’t practical for users that never bring private keys online). Often, these missing features drive integrators to run some sort of additional “indexing” software and implement their own libraries to handle transaction construction.
rosetta-bitcoin provides access to all these features, requires no configuration by default, and can be started with a single command. Furthermore, rosetta-bitcoin enables these features exclusively through RPC interaction with Bitcoin Core so we don’t need to maintain a fork of Bitcoin Core to enable this new functionality and easy configuration!
Rosetta API Refresher
rosetta-bitcoin implements both of the Rosetta API core components: the Data API and the Construction API. Together, these components provide universal read and write access to Bitcoin. We’ve included several diagrams below that outline the specific endpoints that any Rosetta API implementation supports. If you are interested in building on top of an implementation, we recommend using rosetta-sdk-go (which abstracts away these flows behind Golang functions).
The Data API consists of all the endpoints used to “get information” about a blockchain. We can get the networks supported by an implementation (which may be > 1 if a blockchain supports sharding or if it is a gateway to multiple networks), the supported operation types on each network, and the status of each network.
The Data API also allows for getting the contents of any block, getting a particular transaction in a block, and fetching the balance of any account present in a block. Rosetta validation tooling ensures that the balance computed for any account from operations in blocks is equal to the balance returned by the node (often called “reconciliation”).
Lastly, the Data API allows for fetching all mempool transactions and for fetching any particular mempool transaction. This is useful for integrators that want to monitor the status of their broadcasts and to inspect any incoming deposits before they are confirmed on-chain.
While the Data API provides the ability to read data from a blockchain in a standard format, the Construction API enables developers to write to a blockchain (i.e. construct transactions) in a standard format. To meet strict security standards, implementations are expected to be stateless, operate entirely offline, and support detached key generation and signing. We can derive an address from a public key (on blockchains that don’t require on-chain origination).
When constructing a transaction generically, it is often not possible to fully specify the result or what may appear on-chain (ex: constructing a transaction that attempts to use a “flash loan”). We call the collection of operations we can specify the transaction “intent” (which is usually a subset of all operations in the on-chain transaction). At a high-level, constructing a transaction with the Construction API entails creating an “intent”, gathering the metadata required to create a transaction with the “intent”, signing payloads from accounts responsible for the “intent”, and broadcasting the transaction created. Before attempting to sign or broadcast a transaction, we confirm that the transaction we constructed has the same “intent” we originally provided when kicking off the construction flow. You can see this entire construction flow in the diagram below:
Once we have a signed transaction (that performs the “intent” of our choosing), we can calculate its network-specific hash and broadcast it.
How it Works
We optimized for package re-use when developing rosetta-bitcoin. If it could be done with an existing package from rosetta-sdk-go, we used it. This has led to upstreaming a few significant performance improvements as we benchmarked and optimized rosetta-bitcoin.
We use Bitcoin Core to sync blocks/broadcast transactions, ingest those blocks using the syncer package, store processed blocks using the storage package, and serve Rosetta API requests using the server package from data cached using the storage package. You can find a high-level view of this architecture below:
To implement the Rosetta API /account/balance endpoint, we had to build a UTXO indexer that provides atomic balance lookups. “Atomic” in this sense means that we can get the balance of an account with the block index and block hash where it was valid in a single RPC call. With our Rosetta Bitcoin implementation, you don’t need to run a separate indexer anymore!
We implemented concurrent block ingestion to speed up block syncing and automatic pruning to remove blocks from Bitcoin Core after we ingest a block to save on space. Concurrent block ingestion allows us to populate multiple blocks ahead of the currently processing block while we wait for the most recently populated block to save (keeping our storage resources busy). Because we store all ingested blocks in our own storage cache, we don’t need to keep duplicate data around in Bitcoin Core’s database.
Last but not least, we implemented stateless, offline, curve-based transaction construction for sending from any SegWit-Bech32 Address. We opted to only support sending from SegWit-Bech32 addresses to minimize complexity in the first release (there are a lot of new moving pieces here). We look forward to reviewing community contributions that add MultiSig, Lightning, and other address support.
Try it Out
Enough with the talk, show me the code! This section will walk you through building rosetta-bitcoin, starting rosetta-bitcoin, interacting with rosetta-bitcoin, and testing rosetta-bitcoin. To complete the following steps, you need to be on a computer that meets the rosetta-bitcoin system requirements and you must install Docker.
First, we need to download the pre-built rosetta-bitcoin Docker image (saved with the tag rosetta-bitcoin:latest):
curl -sSfL https://raw.githubusercontent.com/coinbase/rosetta-bitcoin/master/install.sh | sh -s
Next, we need to start a container using our downloaded image (the container is started in detached mode):
docker run -d --rm --ulimit "nofile=100000:100000" -v "$(pwd)/bitcoin-data:/data" -e "MODE=ONLINE" -e "NETWORK=TESTNET" -e "PORT=8080" -p 8080:8080 -p 18333:18333 rosetta-bitcoin:latest
After starting the container, you will see an identifier printed in your terminal (that’s the Docker container ID). To view logs from this running container, you should run:
docker logs --tail 100 -f <container_id>
To make sure things are working, let’s make a cURL request for the current network status (you may need to wait a few minutes for the node to start syncing):
curl --request POST 'http://localhost:8080/network/status' \
--header 'Accept: application/json' \
--header 'Content-Type: application/json' \
--data-raw '{
"network_identifier": {
"blockchain": "Bitcoin",
"network": "Testnet3"
}
}' | jq
Now that rosetta-bitcoin is running, the fun can really begin! Next, we install rosetta-cli, our CLI tool for interacting with and testing Rosetta API implementations (this will be installed at ./bin/rosetta-cli):
curl -sSfL https://raw.githubusercontent.com/coinbase/rosetta-cli/master/scripts/install.sh | sh -s
We recommend moving this downloaded rosetta-cli binary into your bin folder so that it can be run by calling rosetta-cli instead of ./bin/rosetta-cli). The rest of this walkthrough assumes that you’ve done this.
We also need to download the configuration file for interacting with rosetta-bitcoin:
curl -sSfL https://raw.githubusercontent.com/coinbase/rosetta-bitcoin/master/rosetta-cli-conf/bitcoin_testnet.json -o bitcoin_testnet.json
We can lookup the current sync status:
rosetta-cli view:networks --configuration-file bitcoin_testnet.json
We can lookup the contents of any synced block (make sure the index you lookup is less than the index returned by the current index returned in sync status):
rosetta-cli view:block <block index> --configuration-file bitcoin_testnet.json
We can validate the Data API endpoints using the the `check:data` command:
rosetta-cli check:data --configuration-file bitcoin_testnet.json
This test will sync all blocks and confirm that the balance for each account returned by the `/account/balance` endpoint matches the computed balance using Rosetta operations.
Lastly, we can validate the Construction API endpoints using the `check:construction` command:
rosetta-cli check:construction --configuration-file bitcoin_testnet.json
This test will create, broadcast, and confirm testnet transactions until we reach our specified exit conditions (# of successful transactions of each type). This test automatically adjusts fees based on the estimated size of the transactions it creates and returns all funds to a faucet address at the end of the test.
When you are done playing around with rosetta-bitcoin, run the following command to shut it down:
docker kill --signal=2 <container_id>
Future Work
Publish benchmarks for sync speed, storage usage, and load testing on both testnet and mainnet
Implement Rosetta API /mempool/transaction endpoint
Add CI test to repository using rosetta-cli (likely on a regtest network)
Support Multi-Sig transactions and multi-phase transaction construction
Write a wallet package (using rosetta-sdk-go primitives) to orchestrate transaction construction for any Rosetta implementation (you can find some early work on this effort here)
If you are interested in any of these items, reach out on the community site.
Work at Coinbase
We are actively hiring passionate developers to join the Crypto team and a developer relations lead to work on the Rosetta project. If you are interested in helping to build this common language for interacting with blockchains, Coinbase is hiring.
This website contains links to third-party websites or other content for information purposes only (“Third-Party Sites”). The Third-Party Sites are not under the control of Coinbase, Inc., and its affiliates (“Coinbase”), and Coinbase is not responsible for the content of any Third-Party Site, including without limitation any link contained in a Third-Party Site, or any changes or updates to a Third-Party Site. Coinbase is not responsible for webcasting or any other form of transmission received from any Third-Party Site. Coinbase is providing these links to you only as a convenience, and the inclusion of any link does not imply endorsement, approval or recommendation by Coinbase of the site or any association with its operators.
All images provided herein are by Coinbase.
Introducing rosetta-bitcoin: Coinbase’s Bitcoin implementation of the Rosetta API was originally published in The Coinbase Blog on Medium, where people are continuing the conversation by highlighting and responding to this story.
from Money 101 https://blog.coinbase.com/introducing-rosetta-bitcoin-coinbases-bitcoin-implementation-of-the-rosetta-api-71323052b32c?source=rss----c114225aeaf7---4 via http://www.rssmix.com/
0 notes
Text
Docker Update Ubuntu


Docker Ubuntu Change Timezone
Docker-compose Update Ubuntu
Update: 2018-09-10 The reason for choosing ufw-user-forward, not ufw-user-input using ufw-user-input. Pro: Easy to use and understand, supports older versions of Ubuntu. For example, to allow the public to visit a published port whose container port is 8080, use the command. Docker containers are designed to be ephemeral. To update an existing container, you remove the old one and start a new one. Thus the process that you are following is the correct one. You can simplify the commands to the following ones: docker-compose up -force-recreate -build -d docker image prune -f.
-->
You can configure automatic log upload for continuous reports in Cloud App Security using a Docker on an on-premises Ubuntu, Red Hat Enterprise Linux (RHEL), or CentOS server.
Prerequisites
OS:
Ubuntu 14.04, 16.04, and 18.04
RHEL 7.2 or higher
CentOS 7.2 or higher
Disk space: 250 GB
CPU: 2
RAM: 4 GB
Set your firewall as described in Network requirements
Note
If you have an existing log collector and want to remove it before deploying it again, or if you simply want to remove it, run the following commands:
Log collector performance
The Log collector can successfully handle log capacity of up to 50 GB per hour. The main bottlenecks in the log collection process are:
Network bandwidth - Your network bandwidth determines the log upload speed.
I/O performance of the virtual machine - Determines the speed at which logs are written to the log collector's disk. The log collector has a built-in safety mechanism that monitors the rate at which logs arrive and compares it to the upload rate. In cases of congestion, the log collector starts to drop log files. If your setup typically exceeds 50 GB per hour, it's recommended that you split the traffic between multiple log collectors.
Set up and configuration
Step 1 – Web portal configuration: Define data sources and link them to a log collector
Go to the Automatic log upload settings page.
In the Cloud App Security portal, click the settings icon followed by Log collectors.
For each firewall or proxy from which you want to upload logs, create a matching data source.
Click Add data source.
Name your proxy or firewall.
Select the appliance from the Source list. If you select Custom log format to work with a network appliance that isn't listed, see Working with the custom log parser for configuration instructions.
Compare your log with the sample of the expected log format. If your log file format doesn't match this sample, you should add your data source as Other.
Set the Receiver type to either FTP, FTPS, Syslog – UDP, or Syslog – TCP, or Syslog – TLS.
Note
Integrating with secure transfer protocols (FTPS and Syslog – TLS) often requires additional settings or your firewall/proxy.
f. Repeat this process for each firewall and proxy whose logs can be used to detect traffic on your network. It's recommended to set up a dedicated data source per network device to enable you to:
Monitor the status of each device separately, for investigation purposes.
Explore Shadow IT Discovery per device, if each device is used by a different user segment.
Go to the Log collectors tab at the top.
Click Add log collector.
Give the log collector a name.
Enter the Host IP address of the machine you'll use to deploy the Docker. The host IP address can be replaced with the machine name, if there is a DNS server (or equivalent) that will resolve the host name.
Select all Data sources that you want to connect to the collector, and click Update to save the configuration.
Further deployment information will appear. Copy the run command from the dialog. You can use the copy to clipboard icon.
Export the expected data source configuration. This configuration describes how you should set the log export in your appliances.
Note
A single Log collector can handle multiple data sources.
Copy the contents of the screen because you will need the information when you configure the Log Collector to communicate with Cloud App Security. If you selected Syslog, this information will include information about which port the Syslog listener is listening on.
For users sending log data via FTP for the first time, we recommend changing the password for the FTP user. For more information, see Changing the FTP password.
Step 2 – On-premises deployment of your machine
The following steps describe the deployment in Ubuntu.
Note
The deployment steps for other supported platforms may be slightly different.
Open a terminal on your Ubuntu machine.
Change to root privileges using the command: sudo -i
To bypass a proxy in your network, run the following two commands:
If you accept the software license terms, uninstall old versions and install Docker CE by running the commands appropriate for your environment:
Remove old versions of Docker: yum erase docker docker-engine docker.io
Install Docker engine prerequisites: yum install -y yum-utils
Add Docker repository:
Install Docker engine: yum -y install docker-ce
Start Docker
Test Docker installation: docker run hello-world
Remove old versions of Docker: yum erase docker docker-engine docker.io
Install Docker engine prerequisites:
Add Docker repository:
Install dependencies:
Install Docker engine: sudo yum install docker-ce
Start Docker
Test Docker installation: docker run hello-world
Remove the container-tools module: yum module remove container-tools
Add the Docker CE repository: yum-config-manager --add-repo https://download.docker.com/linux/centos/docker-ce.repo
Modify the yum repo file to use CentOS 8/RHEL 8 packages: sed -i s/7/8/g /etc/yum.repos.d/docker-ce.repo
Install Docker CE: yum install docker-ce
Start Docker
Test Docker installation: docker run hello-world
Remove old versions of Docker: apt-get remove docker docker-engine docker.io
If you are installing on Ubuntu 14.04, install the linux-image-extra package.
Install Docker engine prerequisites:
Verify that the apt-key fingerprint UID is [email protected]: apt-key fingerprint | grep uid
Install Docker engine:
Test Docker installation: docker run hello-world
Deploy the collector image on the hosting machine by importing the collector configuration. Import the configuration by copying the run command generated in the portal. If you need to configure a proxy, add the proxy IP address and port number. For example, if your proxy details are 192.168.10.1:8080, your updated run command is:
Verify that the collector is running properly with the following command: docker logs <collector_name>
You should see the message: Finished successfully!
Step 3 - On-premises configuration of your network appliances
Configure your network firewalls and proxies to periodically export logs to the dedicated Syslog port or the FTP directory according to the directions in the dialog. For example:
Step 4 - Verify the successful deployment in the Cloud App Security portal


Check the collector status in the Log collector table and make sure the status is Connected. If it's Created, it's possible the log collector connection and parsing haven't completed.
You can also go to the Governance log and verify that logs are being periodically uploaded to the portal.
Alternatively, you can check the log collector status from within the docker container using the following commands:
Log in to the container by using this command: docker exec -it <Container Name> bash
Verify the log collector status using this command: collector_status -p
If you have problems during deployment, see Troubleshooting Cloud Discovery.
Optional - Create custom continuous reports
Verify that the logs are being uploaded to Cloud App Security and that reports are generated. After verification, create custom reports. You can create custom discovery reports based on Azure Active Directory user groups. For example, if you want to see the cloud use of your marketing department, import the marketing group using the import user group feature. Then create a custom report for this group. You can also customize a report based on IP address tag or IP address ranges.
Docker Ubuntu Change Timezone
In the Cloud App Security portal, under the Settings cog, select Cloud Discovery settings, and then select Continuous reports.
Click the Create report button and fill in the fields.
Under the Filters you can filter the data by data source, by imported user group, or by IP address tags and ranges.
Next steps
Docker-compose Update Ubuntu
If you run into any problems, we're here to help. To get assistance or support for your product issue, please open a support ticket.
0 notes
Text
Manipulating Docker in Python (Pull Image, Create/Restart/Delete Container, Port Forwarding)
Manipulating Docker in Python (Pull Image, Create/Restart/Delete Container, Port Forwarding)
I wrote this up because I couldn’t find any relatively straight forward answers online that provide an example of consistent usage of Docker in Python.
The code does the following steps:
Checks if the Container Exists:
Deletes the Container
Restarts the Container
If Container doesn’t exist –
Pulls the Image down from Docker Central
Creates the Container with specified Port Mappings and…
View On WordPress
0 notes
Text
One year using Kubernetes in production: Lessons learned
Starting out with containers and container orchestration tools
I now believe containers are the deployment format of the future. They make it much easier to package an application with its required infrastructure. While tools such as Docker provide the actual containers, we also need tools to take care of things such as replication and failovers, as well as APIs to automate deployments to multiple machines.
The state of clustering tools such as Kubernetes and Docker Swarm was very immature in early 2015, with only early alpha versions available. We still tried using them and started with Docker Swarm.
At first we used it to handle networking on our own with the ambassador pattern and a bunch of scripts to automate the deployments. How hard could it possibly be? That was our first hard lesson: Container clustering, networking, and deployment automation are actually very hard problems to solve.
We realized this quickly enough and decided to bet on another one of the available tools. Kubernetes seemed to be the best choice, since it was being backed by Google, Red Hat, Core OS, and other groups that clearly know about running large-scale deployments.
Load balancing with Kubernetes
When working with Kubernetes, you have to become familiar with concepts such as pods, services, and replication controllers. If you're not already familiar with these concepts, there are some excellent resources available to get up to speed. The Kubernetes documentation is a great place to start, since it has several guides for beginners.
Once we had a Kubernetes cluster up and running, we could deploy an application using kubectl, the Kubernetes CLI, but we quickly found that kubectl wasn't sufficient when we wanted to automate deployments. But first, we had another problem to solve: How to access the deployed application from the Internet?
The service in front of the deployment has an IP address, but this address only exists within the Kubernetes cluster. This means the service isn’t available to the Internet at all! When running on Google Cloud Engine, Kubernetes can automatically configure a load balancer to access the application. If you’re not on GCE (like us), you need to do a little extra legwork to get load balancing working.
It’s possible to expose a service directly on a host machine port—and this is how a lot of people get started—but we found that it voids a lot of Kubernetes' benefits. If we rely on ports in our host machines, we will get into port conflicts when deploying multiple applications. It also makes it much harder to scale the cluster or replace host machines.
A two-step load-balancer setup
We found that a much better approach is to configure a load balancer such as HAProxy or NGINX in front of the Kubernetes cluster. We started running our Kubernetes clusters inside a VPN on AWS and using an AWS Elastic Load Balancer to route external web traffic to an internal HAProxy cluster. HAProxy is configured with a “back end” for each Kubernetes service, which proxies traffic to individual pods.
This two-step load-balancer setup is mostly in response AWS ELB's fairly limited configuration options. One of the limitations is that it can’t handle multiple vhosts. This is the reason we’re using HAProxy as well. Just using HAProxy (without an ELB) could also work, but you would have to work around dynamic AWS IP addresses on the DNS level.
In any case, we needed a mechanism to dynamically reconfigure the load balancer (HAProxy, in our case) when new Kubernetes services are created.
The Kubernetes community is currently working on a feature called ingress. It will make it possible to configure an external load balancer directly from Kubernetes. Currently, this feature isn’t really usable yet because it’s simply not finished. Last year, we used the API and a small open-source tool to configure load balancing instead.
Configuring load balancing
First, we needed a place to store load-balancer configurations. They could be stored anywhere, but because we already had etcd available, we decided to store the load-balancer configurations there. We use a tool called confd to watch configuration changes in etcd and generate a new HAProxy configuration file based on a template. When a new service is added to Kubernetes, we add a new configuration to etcd, which results in a new configuration file for HAProxy.
Kubernetes: Maturing the right way
There are still plenty of unsolved problems in Kubernetes, just as there are in load balancing generally. Many of these issues are recognized by the community, and there are design documents that discuss new features that can solve some of them. But coming up with solutions that work for everyone requires time, which means some of these features can take quite a while before they land in a release. This is a good thing, because it would be harmful in the long term to take shortcuts when designing new functionality.
This doesn’t mean Kubernetes is limited today. Using the API, it’s possible to make Kubernetes do pretty much everything you need it to if you want to start using it today. Once more features land in Kubernetes itself, we can replace custom solutions with standard ones.
After we developed our custom solution for load balancing, our next challenge was implementing an essential deployment technique for us: Blue-green deployments.
Blue-green deployments in Kubernetes
A blue-green deployment is one without any downtime. In contrast to rolling updates, a blue-green deployment works by starting a cluster of replicas running the new version while all the old replicas are still serving all the live requests. Only when the new set of replicas is completely up and running is the load-balancer configuration changed to switch the load to the new version. A benefit of this approach is that there’s always only one version of the application running, reducing the complexity of handling multiple concurrent versions. Blue-green deployments also work better when the number of replicas is fairly small.
Figure 2 shows a component “Deployer” that orchestrates the deployment. This component can easily be created by your own team because we open-sourced our implementation under the Apache License as part of the Amdatu umbrella project. It also comes with a web UI to configure deployments.
An important aspect of this mechanism is the health checking it performs on the pods before reconfiguring the load balancer. We wanted each component that was deployed to provide a health check. Now we typically add a health check that's available on HTTP to each application component.
Making the deployments automatic
With the Deployer in place, we were able to hook up deployments to a build pipeline. Our build server can, after a successful build, push a new Docker image to a registry such as Docker Hub. Then the build server can invoke the Deployer to automatically deploy the new version to a test environment. The same image can be promoted to production by triggering the Deployer on the production environment.
Know your resource constraints
Knowing our resource constraints was critical when we started using Kubernetes. You can configure resource requests and CPU/memory limits on each pod. You can also control resource guarantees and bursting limits.
These settings are extremely important for running multiple containers together efficiently. If we didn't set these settings correctly, containers would often crash because they couldn't allocate enough memory.
Start early with setting and testing constraints. Without constraints, everything will still run fine, but you'll get a big, unpleasant surprise when you put any serious load on one of the containers.
How we monitored Kubernetes
When we had Kubernetes mostly set up, we quickly realized that monitoring and logging would be crucial in this new dynamic environment. Logging into a server to look a log files just doesn’t work anymore when you're dealing with a large number of replicas and nodes. As soon as you start using Kubernetes, you should also have a plan to build centralized logging and monitoring.
Logging
There are plenty of open-source tools available for logging. We decided to use Graylog—an excellent tool for logging—and Apache Kafka, a messaging system to collect and digest logs from our containers. The containers send logs to Kafka, and Kafka hands them off to Graylog for indexing. We chose to make the application components send logs to Kafka themselves so that we could stream logs in an easy-to-index format. Alternatively, there are tools that retrieve logs from outside the container and forward them to a logging solution.
Monitoring
Kubernetes does an excellent job of recovering when there's an error. When pods crash for any reason, Kubernetes will restart them. When Kubernetes is running replicated, end users probably won't even notice a problem. Kubernetes recovery works so well that we have had situations where our containers would crash multiple times a day because of a memory leak, without anyone (including ourselves) noticing it.
Although this is great from the perspective of Kubernetes, you probably still want to know whenever there’s a problem. We use a custom health-check dashboard that monitors the Kubernetes nodes, individual pods—using application-specific health checks—and other services such as data stores. To implement a dashboard such as this, the Kubernetes API proves to be extremely valuable again.
We also thought it was important to measure load, throughput, application errors, and other stats. Again, the open-source space has a lot to offer. Our application components post metrics to an InfluxDB time-series store. We also use Heapster to gather Kubernetes metrics. The metrics stored in InfluxDB are visualized in Grafana, an open-source dashboard tool. There are a lot of alternatives to the InfluxDB/Grafana stack, and any one of them will provide a lot of value toward keeping track of how things are running.
Data stores and Kubernetes
A question that many new Kubernetes users ask is “How should I handle my data stores with Kubernetes?”
When running a data store such as MongoDB or MySQL, you most likely want the data to be persistent. Out of the box, containers lose their data when they restart. This is fine for stateless components, but not for a persistent data store. Kubernetes has the concept of volumes to work with persistent data.
A volume can be backed by a variety of implementations, including files on the host machines, AWS Elastic Block Store (EBS), and nfs. When we were researching the question of persistent data, this provided a good answer, but it wasn't an answer for our running data stores yet.
Replication issues
In most deployments, the data stores also run replicated. Mongo typically runs in a Replica Set, and MySQL could be running in primary/replica mode. This introduces a few problems. First of all, it’s important that each node in the data store’s cluster is backed by a different volume. Writing to the same volume will lead to data corruption. Another issue is that most data stores require precise configuration to get the clustering up and running; auto discovery and configuration of nodes is not common.
At the same time, a machine that runs a data store is often specifically tuned for that type of workload. Higher IOPS could be one example. Scaling (adding/removing nodes) is an expensive operation for most data stores as well. All these things don’t match very well with the dynamic nature of Kubernetes deployments.
The decision not to use Kubernetes for running data stores in production
This brings us to a situation where we found that the benefits of running a data store inside Kubernetes are limited. The dynamics that Kubernetes give us can’t really be used. The setup is also much more complex than most Kubernetes deployments.
Because of this, we are not running our production data stores inside Kubernetes. Instead, we set up these clusters manually on different hosts, with all the tuning necessary to optimize the data store in question. Our applications running inside Kubernetes just connect to the data store cluster like normal. The important lesson is that you don’t have to run everything in Kubernetes once you have Kubernetes. Besides data stores and our HAProxy servers, everything else does run in Kubernetes, though, including our monitoring and logging solutions.
Why we're excited about our next year with Kubernetes
Looking at our deployments today, Kubernetes is absolutely fantastic. The Kubernetes API is a great tool when it comes to automating a deployment pipeline. Deployments are not only more reliable, but also much faster, because we’re no longer dealing with VMs. Our builds and deployments have become more reliable because it’s easier to test and ship containers.
We see now that this new way of deployment was necessary to keep up with other development teams around the industry that are pushing out deployments much more often and lowering their overhead for doing so.
Cost calculation
Looking at costs, there are two sides to the story. To run Kubernetes, an etcd cluster is required, as well as a master node. While these are not necessarily expensive components to run, this overhead can be relatively expensive when it comes to very small deployments. For these types of deployments, it’s probably best to use a hosted solution such as Google's Container Service.
For larger deployments, it’s easy to save a lot on server costs. The overhead of running etcd and a master node aren’t significant in these deployments. Kubernetes makes it very easy to run many containers on the same hosts, making maximum use of the available resources. This reduces the number of required servers, which directly saves you money. When running Kubernetes sounds great, but the ops side of running such a cluster seems less attractive, there are a number of hosted services to look at, including Cloud RTI, which is what my team is working on.
A bright future for Kubernetes
Running Kubernetes in a pre-released version was challenging, and keeping up with (breaking) new releases was almost impossible at times. Development of Kubernetes has been happening at light-speed in the past year, and the community has grown into a legitimate powerhouse of dev talent. It’s hard to believe how much progress has been made in just over a year.[Source]-https://techbeacon.com/devops/one-year-using-kubernetes-production-lessons-learned
Basic & Advanced Kubernetes Course using cloud computing, AWS, Docker etc. in Mumbai. Advanced Containers Domain is used for 25 hours Kubernetes Training.
0 notes
Text
Basic commands/operations in Kubernetes
Kubectl is a command-line interface that is used to run commands against the clusters of Kubernetes. It’s a CLI tool for the users through which you can communicate with the Kubernetes API server. Before running the command in the terminal, kubectl initially checks for the file name “config” and which you can see in the $HOME/.Kube directory. From a technical point of view, kubectl is a client for the Kubernetes API & from a user's point of view, it’s your cockpit to control the whole Kubernetes.
Kubectl syntax describes the command operations. To run the operations, kubectl includes the supported flags along with subcommands. And via this part of the Kubernetes series, we are going to render you some of the operations.
I. STARTING COMMANDS
1. Create
kubectl create −. kubectl create −. To run the operation we usually use the kubectl to create command. To do this, JSON or YAML formats are accepted.
$ kubectl create -f file_name.yaml
To specify the resources with one or more files: -f file1 -f file2 -f file...
Below is the list through which we use to create multiple things by using the kubectl command.
deployment namespace quota secret docker-registry secret secret generic secret tls serviceaccount service clusterip service loadbalancer service nodeport service nodeport
2. Get
Display one or many resources, This command is capable of fetching data on the cluster about the Kubernetes resources.
List all pods in the ps output format.
$ kubectl get pods
List all pods in ps output format with more information (such as node name).
$ kubectl get pods -o wide
List a single replication controller with specified NAME in the ps output format.
$ kubectl get replicationcontroller web
List deployments in JSON output format, in the "v1" version of the "apps" API group:
$ kubectl get deployments.v1.apps -o json
List a pod recognized by type and name specified in "pod.yaml" in the JSON output format.
$ kubectl get -f pod.yaml -o json
3. Run
Create and run a particular image, possibly replicated.
Creates a deployment or job to manage the created container(s).
Start a single instance of nginx.
$ kubectl run nginx --image=nginx
4. Expose
Expose a resource as a new Kubernetes service.
$ kubectl expose rc nginx --port=80 --target-port=8000
5. Delete
kubectl delete − Delete resources by filenames, stdin, resources and names, or by resources and label selector.
$ kubectl delete –f file_name/type_name --all
Delete all pods
$ kubectl delete pods --all
Delete pods and services with label name=myLabel.
$ kubectl delete pods,services -l name=myLabel
Delete a pod with minimal delay
II. APPLY MANAGEMENT
1. Apply
kubectl apply − It holds the capability to configure a resource by file or stdin.
$ kubectl apply –f filename
2. Annotate
kubectl annotate − To attach metadata to Kubernetes objects, you can use either labels or annotations. As labels can be mostly used to opt the objects and to find collections of objects that satisfy certain conditions.
$ kubectl annotate created_object -f file_name resource-version _key = value $ kubectl get pods pod_name --output=yaml
3. Autoscale
kubectl autoscale − Autoscale is employed to auto-scale the pods which are specified as Deployment, replica set, Replication Controller. It also creates an autoscaler that automatically selects and sets the number of pods that runs in the Kubernetes cluster.
$ autoscale -f file_name/type [--min=MINPODS] --max=MAXPODS [--cpu-percent=CPU] $ kubectl autoscale deployment foo --min=2 --max=10
4. Convert
Convert 'pod.yaml' to the most advanced version and print to stdout.
The command takes filename, directory, or URL as an input, and transforms it into the format of the version defined by --output-version flag. If the target version is not specified or not supported, convert to the latest version.
$ kubectl convert -f pod.yaml
5. kubectl edit − It is applied to end the resources on the server. This allows us to directly edit a resource that one can receive via the command-line tool.
$ kubectl edit Resource/Name | File Name
6. Replace
Replace a resource by filename or stdin.
JSON and YAML formats are accepted. If replacing an existing resource, the complete resource spec must be provided. This can be obtained by
$ kubectl replace -f file_name
7. Rollout
kubectl rollout − It is more competent in managing the rollout of deployment.
$ Kubectl rollout Sub_Command $ kubectl rollout undo deployment/tomcat
Apart from the above, we can perform multiple tasks using the rollout such as
rollout history
View the rollout history of a deployment
$ kubectl rollout history deployment/abc
rollout pause
the provided resource as paused
$ kubectl rollout pause deployment/nginx
To resume a paused resource.
$ kubectl rollout resume
rollout resume
Resume a paused resource
$ kubectl rollout resume deployment/nginx
rollout status
Watch the rollout status of a deployment
$ kubectl rollout status deployment/nginx
rollout undo
Rollback to the previous deployment
$ kubectl rollout undo deployment/abc
8. Scale
kubectl scale − It will scale the dimension of Kubernetes Deployments, ReplicaSet, Replication Controller, or job.
$ kubectl scale –replica = 3 FILE_NAME
III. WORK WITH APPS
1. cp
kubectl cp− Copy files and directories to and from containers.
$ kubectl cp Files_from_source Files_to_Destination $ kubectl cp /tmp/foo -pod:/tmp/bar -c specific-container
2. Describe
kubectl describe − Describes any appropriate resources in Kubernetes. Confers the details of a resource or an assortment of resources.
$ kubectl describe type type_name
Describe a pod
$ kubectl describe pod/nginx
Describe a pod identified by type and name in "pod.json"
$ kubectl describe -f pod.json
Describe all pods
$ kubectl describe pods
Describe pods by label name=label_name
$ kubectl describe po -l name=label_name
3. exec
kubectl exec− This helps to execute a command in the container.
$ kubectl exec POD -c container --command args $ kubectl exec 123-5-456 date
4. logs
They are employed to get the logs of the container in a pod. Printing the logs can be defining the container name in the pod. If the POD has only one container there is no need to define its name.
$ kubectl logs container_name $ kubectl logs nginx
5. port-forward
Forward one or more local ports to a pod. They are accepted to forward one or more local port to pods.
Listen on ports 5000 and 6000 locally, forwarding data to/from ports 5000 and 6000 in the pod
$ kubectl port-forward pod/mypod 5000 6000 $ kubectl port-forward tomcat 3000 4000 $ kubectl port-forward deployment/mydeployment 5000 6000
6. Top
kubectl top node − It displays CPU/Memory/Storage usage. The prime or the foremost command enables you to see the resource use for the nodes.
$ kubectl top node node_name
pod
Display metrics for all pods in the default namespace
$ kubectl top pod
node
Display metrics for all nodes
$ kubectl top node
7. Attach
kubectl attach − Its major function is to attach things to the running container.
$ kubectl attach pod –c containers
IV. CLUSTER MANAGEMENT
1. API-versions
kubectl API-versions − Basically, it prints the supported versions of API on the cluster.
$ kubectl api-version
2. cluster-info
kubectl cluster-info − It represents the cluster Info.
Display addresses of the master and services with label kubernetes.io/cluster-service=true
Besides, debug and diagnose cluster problems, use 'kubectl cluster-info dump'.
$ kubectl cluster-info
Dumps
Dumps cluster-info out suitable for debugging and diagnosing cluster problems. By default, dumps everything to stdout. You can optionally specify a directory with --output-directory. If you specify a directory, the Kubernetes will build an assortment of files in that directory.
By default only dumps things in the 'Kube-system' namespace, but you can shift to a different namespace with the --namespaces flag or specify --all-namespaces to dump all namespaces.
$ kubectl cluster-info dump --output-directory = /path/to/cluster-state
3. Certificate
Modify certificate resources.
approve
Approve/Accept a certificate signing request.
$ kubectl approve -f file_name/type
deny
Deny a certificate signing request. This action represents a certificate signing controller to not to issue a certificate to the requestor.
$ kubectl deny -f file_name/type
4. Drain
kubectl drain − This is used to drain a node for preservation purposes. It makes the node for maintenance. This will mark the node as unavailable so that it should not be indicated with a new container that will be created.
$ kubectl drain node_name –force
V. KUBECTL SETTINGS AND USAGE
1. Api-resources
Print the supported API Resources
$ kubectl api-resources
Print the supported API Resources with more information
$ kubectl api-resources -o wide
2. config
current-context
kubectl config current-context − It displays the current context.
$ kubectl config current-context
delete-cluster
kubectl config delete-cluster − Deletes the specified cluster from kubeconfig.
$ kubectl config delete-cluster cluster_name
delete-context
kubectl config delete-context − Deletes a specified context from kubeconfig.
$ kubectl config delete-context cluster_name
get-clusters
kubectl config get-clusters − Displays cluster defined in the kubeconfig.
$ kubectl config get-cluster $ kubectl config get-cluster cluster_name
get-contexts
kubectl config get-contexts − Specifies one or many contexts. Displays one or many contexts from the kubeconfig file.
$ kubectl config get-context cluster_name
rename-context
Renames a context from the kubeconfig file.
CONTEXT_NAME is the context name that you wish to change.
NEW_NAME is the new name you wish to set.
$ kubectl config rename-context old_name new_name
set
Sets a specific value in a kubeconfig file
PROPERTY_NAME is a dot delimited name where each token implies either an attribute name or a map key. Map keys may not include dots.
PROPERTY_VALUE is the new value you wish to set. Binary fields such as 'certificate-authority-data' expect a base64 encoded string unless the --set-raw-bytes flag is used.
$ kubectl config set PROPERTY_NAME PROPERTY_VALUE
set-cluster
kubectl config set-cluster − Sets the cluster entry in Kubernetes.
Specifying a name that already exists will merge new fields on top of existing values for those fields.
$ kubectl config set-cluster --server=https://1.2.3.4 $ kubectl config set-cluster NAME [--server=server] [--certificate-authority=path/to/certificate/authority] [--insecure-skip-tls-verify=true]
set-context
kubectl config set-context − Sets a context entry in kubernetes entrypoint. Clarifies a name that already exists will merge new fields on top of existing values for those fields.
$ kubectl config set-context NAME [--cluster = cluster_nickname] [-- user = user_nickname] [--namespace = namespace] $ kubectl config set-context gce --user=cluster-admin
set-credentials
kubectl config set-credentials − Sets a user entry in kubeconfig.
Specifying a name that already exists will merge new fields on top of existing values.
Bearer token flags: --token=bearer_token
Basic auth flags: --username=basic_user --password=basic_password
$ kubectl config set-credentials cluster-admin --username = name -- password = your_password
unset
kubectl config unset − It unsets a specific component in kubectl. PROPERTY_NAME is a dot delimited name where each token represents either an attribute name or a map key. Map keys may not hold dots.
$ kubectl config unset PROPERTY_NAME PROPERTY_VALUE
use-context
kubectl config use-context − Sets the current context in kubectl file.
$ kubectl config use-context context_name
view
Display merged kubeconfig settings or a specified kubeconfig file.
You can use --output jsonpath={...} to extract specific values using a JSON path expression.
$ kubectl config view
3. explain
Get the documentation of the resource and its fields
$ kubectl explain pods
Get the documentation of a specific field of a resource
$ kubectl explain pods.spec.containers
4. options
Print flags inherited by all commands
$ kubectl options
5. version
Print the client and server versions for the current context
$ kubectl version
VI. DEPRECATED COMMANDS
1. Rolling
kubectl rolling-update − Operates a rolling update on a replication controller. Reinstates the specified replication controller with a new replication controller by updating a POD at a time.
$ kubectl rolling-update old_container_name new_container_name -- image = new_container_image| -f new_controller_spec $ kubectl rolling-update frontend-v1 –f freontend-v2.yaml
What’s Next
Kubectl syntax mentions the commands as we've explained in the foregoing section. Kubernetes is so profitable for the organizations' artistic team, for each of the project, clarifies deployments, scalability, resilience, it also permits us to consume any underlying infrastructure and you know what it proffers you much to work upon. So let's call it Supernetes from today. Good luck and stay in touch!
0 notes
Text
Deploy a Spring Boot Java app to Kubernetes on GCP-Google Kubernetes Engine

Kubernetes is an open source project, which can run in many different environments, from laptops to high-availability multi-node clusters, from public clouds to on-premise deployments, and from virtual machine (VM) instances to bare metal. You'll use GKE, a fully managed Kubernetes service on Google Cloud Platform, to allow you to focus more on experiencing Kubernetes, rather than setting up the underlying infrastructure. In this post , i will show you the steps to deploy your simple react application to GCP app engine service . Before going for actual deployment you should consider below pre-requisites - GCP account – You need to create at least Free tier GCP account by providing your credit card details which will be valid for 3 months. You can create it using https://cloud.google.com/ Github project - Spring boot project on github (https://github.com/AnupBhagwat7/gcp-examples) Below are the steps to deploy application to App Engine - - Package a simple Java app as a Docker container. - Create your Kubernetes cluster on GKE. - Deploy your Java app to Kubernetes on GKE. - Scale up your service and roll out an upgrade. - Access Dashboard, a web-based Kubernetes user interface. 1. GCP Setup Go to Google cloud console(https://console.cloud.google.com/) and click to open cloud shell -

Run the following command in Cloud Shell to confirm that you are authenticated: gcloud auth list This command will give you below output - Credentialed Accounts ACTIVE ACCOUNT * @ To set the active account, run: $ gcloud config set account `ACCOUNT` Now run the below command to get the list of projects present under your GCP account - gcloud config list project If project is not set then you can do it by using below command - gcloud config set project 2. Package your java application Get the application source code from github - git clone https://github.com/AnupBhagwat7/gcp-examples.git cd gcp-demo-springboot-app Now run the project in gcp cloud shell - mvn -DskipTests spring-boot:run once the application is started , you can click on web preview as shown below -
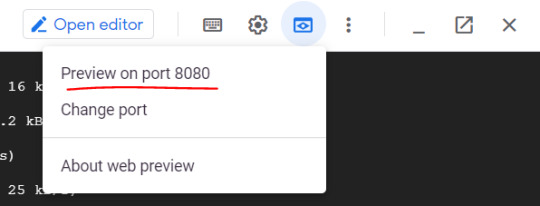
You will be able to see your application launched in browser as below -

3. Package the Java app as a Docker container Next, you need to prepare your app to run on Kubernetes. The first step is to define the container and its contents. You need to take below steps to package your application as a docker image - Step 1: Create the JAR deployable for the app mvn -DskipTests package Step 2: Enable Container Registry to store the container image that you'll create gcloud services enable containerregistry.googleapis.com Step 3: Use Jib maven plugin to create the container image and push it to the Container Registry mvn -DskipTests com.google.cloud.tools:jib-maven-plugin:build -Dimage=gcr.io/$GOOGLE_CLOUD_PROJECT/gcp-demo-springboot-app.jar Step 4: If all goes well, then you should be able to see the container image listed in the console by navigating to CI/CD > Container Registry > Images. You now have a project-wide Docker image available, which Kubernetes can access and orchestrate as you'll see in next steps .
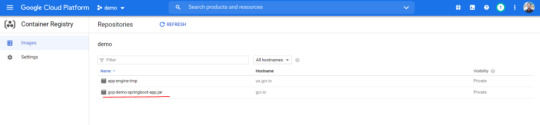
Step 5: You can locally test the image with the following command, which will run a Docker container as a daemon on port 8080 from your newly created container image: docker run -ti --rm -p 8080:8080 gcr.io/$GOOGLE_CLOUD_PROJECT/gcp-demo-springboot-app.jar Step 6: You can go to web preview feature of cloud shell to check if docker container is started successfully .You will see response in browser -

4. Deploy your application to Google Kubernetes Step 1: Create a cluster You're ready to create your GKE cluster. A cluster consists of a Kubernetes API server managed by Google and a set of worker nodes. The worker nodes are Compute Engine VMs. First, make sure that the related API features are enabled gcloud services enable compute.googleapis.com container.googleapis.com Create a cluster named springboot-java-cluster with two n1-standard-1 nodes using below command - gcloud container clusters create springboot-java-cluster --num-nodes 2 --machine-type n1-standard-1 --zone us-central1-c This will take few minutes to create a cluster. You can see all the clusters by navigating to Kubernetes Engine > Clusters

It's now time to deploy your containerized app to the Kubernetes cluster. You'll use the kubectl command line (already set up in your Cloud Shell environment). The rest of the tutorial requires the Kubernetes client and server version to be 1.2 or higher. kubectl version will show you the current version of the command. Step 2: Deploy app to Kubernetes cluster A Kubernetes deployment can create, manage, and scale multiple instances of your app using the container image that you created. Deploy one instance of your app to Kubernetes using the kubectl run command. kubectl create deployment springboot-java --image=gcr.io/$GOOGLE_CLOUD_PROJECT/gcp-demo-springboot-app.jar To view the deployment that you created, simply run the following command: kubectl get deployments To view the app instances created by the deployment, run the following command: kubectl get pods At this point, you should have your container running under the control of Kubernetes, but you still have to make it accessible to the outside world. Step 3: Allow external traffic By default, the Pod is only accessible by its internal IP within the cluster. In order to make the springboot-java container accessible from outside the Kubernetes virtual network, you have to expose the Pod as a Kubernetes service. In Cloud Shell, you can expose the Pod to the public internet with the kubectl expose command combined with the --type=LoadBalancer flag. The flag is required for the creation of an externally accessible IP. kubectl create service loadbalancer springboot-java --tcp=8080:8080 O/P: service/springboot-java created The flag used in the command specifies that you'll be using the load balancer provided by the underlying infrastructure. Note that you directly expose the deployment, not the Pod. That will cause the resulting service to load balance traffic across all Pods managed by the deployment (in this case, only one Pod, but you'll add more replicas later). The Kubernetes Master creates the load balancer and related Compute Engine forwarding rules, target pools, and firewall rules to make the service fully accessible from outside of Google Cloud. To find the publicly accessible IP address of the service, simply request kubectl to list all the cluster services. kubectl get services O/p: NAME TYPE CLUSTER-IP EXTERNAL-IP PORT(S) AGE kubernetes ClusterIP 10.3.240.1 443/TCP 44m springboot-java LoadBalancer 10.3.250.58 34.123.60.207 8080:32034/TCP 85s Notice that there are two IP addresses listed for your service, both serving port 8080. One is the internal IP address that is only visible inside your Virtual Private Cloud. The other is the external load-balanced IP address. In the example, the external IP address is aaa.bbb.ccc.ddd. You should now be able to reach the service by pointing your browser to http://34.123.60.207:8080
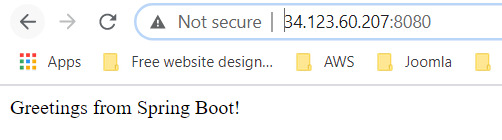
Step 4: Scale your application One of the powerful features offered by Kubernetes is how easy it is to scale your app. Suppose that you suddenly need more capacity for your app. You can simply tell the replication controller to manage a new number of replicas for your app instances. kubectl scale deployment springboot-java --replicas=3 O/P: deployment.apps/springboot-java scaled kubectl get deployment NAME READY UP-TO-DATE AVAILABLE AGE springboot-java 3/3 3 3 23m Step 5: Roll out an upgrade to your service At some point, the app that you deployed to production will require bug fixes or additional features. Kubernetes can help you deploy a new version to production without impacting your users. You can launch editor in CLOUD Shell and update the controller to return a new value as shown below-

Use Jib maven plugin to build and push a new version of the container image. mvn -DskipTests package com.google.cloud.tools:jib-maven-plugin:build -Dimage=gcr.io/$GOOGLE_CLOUD_PROJECT/springboot-java:v2 In order to change the image label for your running container, you need to edit the existing springboot-java deployment and change the image from gcr.io/PROJECT_ID/springboot-java:v1 to gcr.io/PROJECT_ID/springboot-java:v2. You can use the kubectl set image command to ask Kubernetes to deploy the new version of your app across the entire cluster one instance at a time with rolling updates. kubectl set image deployment/springboot-java springboot-java=gcr.io/$GOOGLE_CLOUD_PROJECT/springboot-java:v2 Step 6: Rollback to previous version Perhaps the new version contained an error and you need to quickly roll it back. With Kubernetes, you can roll it back to the previous state easily. Roll back the app by running the following command: kubectl rollout undo deployment/springboot-java This marks the end of this tutorial. Thanks for following. Github link - https://github.com/AnupBhagwat7/gcp-examples/tree/main/gcp-demo-springboot-app Read the full article
0 notes
Text
Continuous testing with new Android emulator tools
Posted by Lingfeng Yang, Android Studio team
Developers often use the Android Emulator during their day-to-day development to quickly test the latest changes before they are being committed. In addition, developers are increasingly using the emulator in their continuous integration (CI) systems to run a larger suite of automated tests. To better support this use-case, we are open sourcing the Android Emulator Container Scripts and improving the developer experiences around two pain points:
Deployability - finding and running the desired version of Android Emulator.
Debuggability - tracking down bugs from remote instances of Android Emulator.
Deployability
Android supports a wide variety of hardware and software configurations, and the Android Emulator is no different. However, this wide variety can create confusion over environment configurations. How should developers obtain emulators and system images? What drivers are required? How do you run with or without CPU or GPU acceleration? (etc. etc.)
To address this we have launched:
Android Emulator Download Script - This script provides the current up-to-date lists of emulator images (both AOSP and with Google Play Services) as well as emulators binaries (supporting Linux, Mac OS and Windows). You can integrate this with your existing continuous integration system. Going forward, we aim to enhance this service to enable downloading of deprecated versions in addition to the latest versions to make it easier to reproduce historical test results.
Android Emulator Docker image generator - Android system images and the emulator is only one part of the story. For environment, drivers, and pre-installed system dependencies, we put together a Docker image generator. This creates the complete environment in which the Android Emulator runs. After you start up the Docker image, 1) port forwarding and ADB, or 2) gRPC and WebRTC, makes interaction with the emulator possible. Currently, the Docker image generator is designed to work in Linux. We are also looking at Mac OS and Windows hosts, so stay tuned!
To increase reproducibility, the underlying Dockerfile template makes the required command line flags and system dependencies more explicit (and reproducible via building Docker images from them). For hardware acceleration, note the --privileged flag that is passed to run.sh; we assume CPU acceleration is available when running the emulator, and --privileged is needed to run the containers with CPU acceleration (KVM) enabled.
For more details on how to create and deploy the Android Emulator image, go to the README.
Debuggability
When the emulator is running and a test or the emulator fails, it can be difficult to dive into the running environment and diagnose the error. Often, diagnosis requires direct interaction with the virtual device. We provide two mechanisms for direct interaction:
ADB
Remote streaming
In the case of ADB, we allow all commands, such as logcat and shell, by forwarding a particular port from the Docker guest to the host. Because the current port is 5555, we'll need to collect more feedback and do more research on how best to separate ports across different containers.
Remote streaming
Security note: With remote streaming, keep in mind that once the service is started, anyone who can connect to your computer on port 80/443 can interact with the emulator. So be careful with running this on a public server!
With remote streaming, you can run the emulator in a container, which is as interactive as running locally. Running the emulator in a container makes it easier to debug issues that can be hard to discover using ADB commands. You can access the emulator using a browser with WebRTC, which is used to stream the video, and gRPC, which is used to send mouse and keyboard events to the emulator. Remote streaming requires three containers:
A container that hosts the latest emulator
A container with an Envoy web proxy needed for gRPC
A container with nginx to serve the React web app
You can compose the Docker containers together using docker-compose, as described in the README. The containers bind to port 80 and 443, so make sure you do not have a web server running. A self-signed certificate will be offered if you point the browser to the host. If you point your browser to the host you should see something like the image below:
Again, keep in mind that anyone who can connect to your host can interact with the emulator. So be careful with running this on a public server!
Let’s scale testing!
Testing can seem to be a tax on development time. However, as many seasoned developers have seen, proper automated testing can increase development velocity as the code base becomes bigger and more complex. Continuous testing should give you confidence that the change you make won’t break your app.
Continuous testing with new Android emulator tools published first on https://phonetracking.tumblr.com/
0 notes
Text
5 of the Best WordPress Development Environment Options
A sAMPle ambiance simply is not like several reasonably a few utility you’ll make the most of when rising wordpress merchandise. It is as a result of reasonably a few options manufacture diversified indispensable jobs. So not like alongside along with your favorite textual order editor, you’ll probably should tranquil be conscious of various sAMPle environments in some unspecified time in the way forward for your occupation.
As an illustration, developing in the neighborhood has reasonably a few penalties to your workflow than the make the most of of a web-based sandbox. What’s extra, your shopper’s sequence of host may even play a function by which type of ambiance is most acceptable (and even available in the market).
On this put up, we’ll take away a sight at 5 of essentially the most handy alternate options for rising a wordpress sAMPle ambiance, and concentrate on about what makes each unusual. Let’s secure going!
The Many Flavors of wordpress Constructing Environments
Ahead of we supply exploring explicit options, it’s price digging deeper into the reasonably a few kinds of environments that exist. Right here’s a transient record of your primary sAMPle ambiance alternate options:
Native ‘container-basically based mostly’ sandboxes. It’s a reasonably distinctive reply for developing in the neighborhood. You’ll bag all-in-one packages providing speedy house introduction, and even ‘push to dwell‘ performance in some instances.
On-line sandboxes. As you could presumably presumably additionally wager, here is one among these completely on-line ambiance that affords grand extra flexibility for sharing your development with prospects. Alternatively, you’re additionally tethered to the online everytime you could presumably nicely wish to work.
Multi-answer stacks. That is the ‘dilapidated-college’ contrivance of native net sAMPle. Instruments corresponding to XAMPP or MAMP are collections of services and products that supply deep customization, however a lot much less flexibility than extra contemporary developments.
These definitions are now not strictly outlined, and there’s actually some crossover between them. Alternatively, you’ll bag that virtually all options may even be loosely grouped into one among these classes, trying on their point of interest.
The trigger we keep in mind so many alternate options is that each has unusual strengths and weaknesses. In reasonably a few phrases, no particular person type of sAMPle ambiance is sweet for all functions. As an illustration, it’s now not easy to make a dwell hyperlink for a shopper the make the most of of a utility adore Vagrant, whereas environments corresponding to Native by Flywheel supply speedy deployment, however may even simply be a lot much less legit and conveyable.
5 of the Best wordpress Constructing Atmosphere Options
For the reasons defined above, it’s handiest to be conscious of a sequence of reasonably a few sAMPle ambiance options. That contrivance, you could presumably presumably additionally make the most of and take away which is handiest for any given challenge.
With out further ado, subsequently, let’s concentrate on a sight at 5 of essentially the most handy alternate options. They’re launched in no explicit articulate, so be at liberty to check out each in flip.
1. WP Sandbox
First up is a reply that you could be presumably presumably additionally simply keep in mind historic ‘by proxy.’ Poopy.existence is a free mannequin of this prime value supplier, which dropped at you by the builders of WP All Import (Soflyy).
WP Sandbox isn’t essentially bought mainly as a way to manufacture wordpress merchandise, however as a bunch for demo order. As an illustration, everytime you click on a Are attempting Demo hyperlink to sight a theme in circulation or a mockup assist stop, WP Sandbox may even simply be the reply powering that demo.
Unnecessary to utter, the speedy deployment is a marquee attribute of this explicit utility, as is the flexibility to share hyperlinks with the world at immense. Because of its infrastructure, WP Sandbox may even be supreme for pre-staging an area – as an illustration, when taking a strictly native house onto the online to share it with prospects.
Pricing begins at $49 per 30 days for 100 lively installs, with essentially the most handy high-cease restrict being your funds.
2. DesktopServer
Subsequent is one among the pioneering sandbox sAMPle environments that become created completely for wordpress websites. DesktopServer is a poke-to desire for a lot of builders, primarily as a result of it’s so easy to make make the most of of.
It’s available in the market for each Residence home windows and macOS, and guarantees massive-swiftly deployment of a wordpress net house that belies the staunch under-the-hood route of. You simply enter some key tiny print, click on a button, and wait a few seconds to your set up to seem within the custom-made Graphical Particular person Interface (GUI).
It’s additionally price declaring that DesktopServer runs on XAMPP, not like many extra contemporary options within the market. Alternatively, the experience total is one among the very handiest, which is a testament to the expertise historic to make it.
There’s a free, characteristic-limited mannequin of DesktopServer available in the market, with the elephantine prime value mannequin retailing for spherical $100.
3. Native by Flywheel
It’s a prime quality wordpress sandbox ambiance. Within the beginning up acknowledge, it’s grand like DesktopServer. Alternatively, there are a few key variations.
As an illustration, whereas there’s tranquil a focus on deployment time, Native runs on Docker as one other of an XAMPP stack. For the uninitiated, Docker is a sAMPle ambiance in its possess simply appropriate, and tons builders secure pleasure from how swiftly it is a lengthy solution to make make the most of of.
Native additionally provides an arguably sleeker GUI as a wrapper for its Docker basis. Alternatively, it is price noting that you could be presumably presumably additionally handiest push to dwell on a Flywheel server, that may even simply or may even simply now not be restrictive trying on whether or not or now not you’re a Flywheel purchaser.
On the plus side, Native by Flywheel is completely free to make make the most of of – so there’s no excuse for now not trying it out.
4. Various Vagrant Vagrants (VVV)
Subsequent up, Vagrant is a wordpress-current substitute to Docker. It’s a conveyable method to make sAMPle environments which can be scAMPer from the articulate line, so it’s large for builders who make the most of that expertise of their workflows.
Various Vagrant Vagrants (VVV) builds on this basis to point of interest on wordpress sAMPle significantly. It entails a trim however practical net interface (even when we’re tranquil speaking just some native utility), and deployment is easy as soon as all of the issues is set up.
Some builders attain bag the fastened ‘provisioning’ disturbing. On the reasonably a few hand, installs are completely moveable, there aren’t any limits on the sequence of internet sites your ‘machine’ can protect, and the utility is completely free.
We’ve essentially talked about VVV on the weblog beforehand. So testing that article have to be your first port of identify should you’re drawn to this sAMPle ambiance.
5. DevKit by WP Engine
It’s a newly launched launch beta, comprising a full suite of devices to converse you how one can to manufacture wordpress web pages.
Contained within the tools you’ll secure:
A container-basically based mostly sAMPle utility
Genesis-particular performance for these the make the most of of Genesis themes
Debugging devices
Performance to push and pull deployments seamlessly
Acquire Shell (SSH) gateway secure admission to
It is seemingly you will perchance presumably presumably liken this opportunity to VVV in numerous how, as a result of the equal benefits for that utility be acutely aware right here too. Alternatively, equal to Native by Flywheel, DevKit provides integration alongside along with your WP Engine anecdote, together with the previously-talked about StudioPress connection.
Plus, as we talked about, DevKit is at present in launch beta. So it received’t price a factor to check it out.
Conclusion
Take pleasure in a fitted swimsuit or a cheerful pair of footwear, your indispensable wordpress sAMPle ambiance is a personal desire. Alternatively, the entire fashionable alternate options attain reasonably a few issues nicely. Subsequently, you could presumably presumably additionally simply should combine and match your chosen sAMPle ambiance to the space and problem.
On this put up, we’ve showcased 5 of the stop options. Let’s recap them swiftly:
WP Sandbox: A burgeoning on-line sandbox from the crew late WP All Import.
DesktopServer: A extra contemporary container-basically based mostly reply with a gradual basis.
Native by Flywheel: A container-basically based mostly sAMPle ambiance that’s free to make make the most of of.
Various Vagrant Vagrants: A wordpress-current and uncomplicated to make make the most of of reply that’s extremely moveable.
DevKit by WP Engine: An launch beta suite that may look you turning spherical digital experiences earlier than you idea possible.
Perform you focus on gotten a accepted wordpress sAMPle ambiance that we’ve missed? Articulate us within the feedback piece beneath!
Picture credit score: PublicDomainPictures.
Tom Rankin
Tom Rankin is a key member of WordCandy, a musician, photographer, vegan, beard proprietor, and (very) beginner coder. When he is now not doing any of these items, he is seemingly sleeping.
The put up 5 of the Best wordpress Constructing Atmosphere Options seemed first on Torque.
from WordPress https://ift.tt/2ZS6sfl via IFTTT
0 notes
Text
Developing Like a Boss – DevOps Series, Part 12
Previous posts in the DevOps Series are available here.
In a constantly changing ecosystem of DevOps tools, it is hard to keep up with new solutions. And it’s even harder to be genuinely impressed by something new. But every once in a while, a new solution appears, making such a strong impression, that you have to include it in your essentials toolset.
As discussed during this series, one of DevOps main goals is to facilitate and automate the whole process – from software development to quality assurance to production. Think about it… what if developers could work locally on their code, while interacting transparently with their remote production environment? And I mean real transparency, like without any containers or kubernetes interaction.
Let me make it crystal clear: I am talking about developers locally coding with their own tools, and testing their software live on containers deployed in a real remote kubernetes cluster. No required knowledge about docker, kubectl, etc. This would be nirvana, right? Well, that’s exactly what Okteto offers!
Code locally with your own tools
Okteto offers developers the ability to locally code with their own tools, and test their software live on containers deployed in a real remote kubernetes cluster, with no required knowledge about docker containers or kubernetes.
Too good to be true? Let’s give it a try!
First you need to install it, and it will automatically work with the k8s cluster active in your kubectl configuration.
By now you should already know how to get a full myhero deployment working on your GKE cluster, so please go ahead and do it yourself. To make it simpler please configure it in ‘direct’ mode, so no myhero-mosca or myhero-ernst is required. Remember you just need to comment with # two lines in k8s_myhero_app.yml (under ‘env’ – ‘myhero_app_mode’). After deployment you should have the 3 required microservices: myhero-ui, myhero-app and myhero-data. Please make sure to configure myhero-ui and myhero-app as LoadBalancer, so they both get public IP addresses. Once the application is working we can try okteto.
Let’s say we are AngularJS developers, and we have been assigned to work on the web front-end microservice (myhero-ui).
First thing we would need to do is cloning the repo, and get into the resulting directory:
$ git clone https://github.com/juliogomez/myhero_ui.git $ cd myhero_ui
Please make sure you have defined the following required 3 variables:
$ export myhero_spark_server=<your_spark_url> $ export myhero_app_server=<your_api_url> $ export myhero_app_key=<your_key_to_communicate_with_app_server>
Then we will have okteto automatically detect the programming language used in the repo, and generate the required manifests based on it. Please make sure to answer n when asked if you would like to create a Kubernetes deployment manifest. We do not need it, because we already have our own myhero-ui manifest, and for this demo we will replace the existing front-end microservice with a new one. We could also create a different deployment and work in parallel with the production one.
$ okteto create JavaScript detected in your source. Recommended image for development: okteto/node:11 Which docker image do you want to use for your development environment? [okteto/node:11]: Create a Kubernetes deployment manifest? [y/n]: n ✓ Cloud native environment created
Okteto will automatically create the new okteto.yml manifest, specifying the deployment target, working directory, port forwarding and some scripts.
We will need to make some changes to make that file work in our setup:
Change the deployment name from myheroui to myhero-ui
Configure it to automatically install and start the code, including the following command: [“yarn”, “start”]
Port mapping: if you take a look at our front-end’s package.json file, you will see it starts an HTTP server in port 8000, so we should change the mapping from 3000:3000 to 3000:8000
For your convenience the myhero-ui repo includes an already modified manifest you can use for this demo.
Now you should be good to activate your cloud native development environment.
$ okteto up --namespace myhero --file okteto_myhero-ui.yml Okteto 0.7.1 is available, please upgrade. ✓ Environment activated! Ports: 3000 -> 8000 Cluster: gke_test-project-191216_europe-west1-b_example-cluster Namespace: myhero Deployment: myhero-ui yarn run v1.12.3 $ npm install npm WARN notice [SECURITY] ecstatic has the following vulnerability: 1 moderate. Go here for more details: https://nodesecurity.io/advisories?search=ecstatic&version=1.4.1 - Run `npm i npm@latest -g` to upgrade your npm version, and then `npm audit` to get more info. npm notice created a lockfile as package-lock.json. You should commit this file. added 24 packages from 27 contributors and audited 24 packages in 5.825s found 1 moderate severity vulnerability run `npm audit fix` to fix them, or `npm audit` for details $ http-server -a localhost -p 8000 -c-1 ./app Starting up http-server, serving ./app Available on: http://localhost:8000 Hit CTRL-C to stop the server
This process replaces the existing myhero-ui container deployment in the kubernetes cluster, with your new one. It will also synchronize files from your workstation to the development environment, and perform the required port forwarding. You may access this new web front-end deployment browsing to http://localhost:3000/
As a developer please use your favourite IDE (or even just vi) in your local workstation to edit, for example, the file defining the front page.
vi ./app/views/main.html
Make a change in your front page title, from ‘Make your voice heard!’ to ‘Make your voice hearRRRd!’, and save your file. Go back to your browser, refresh and you will see your changes reflected immediately!
Let that sink in for a second… as a developer you have modified your code from your local workstation, using your own IDE and tools. And okteto has transparently updated the deployment containers in your production kubernetes cluster. All of that without any docker or kubernetes interaction:
No need to run Docker locally in your workstation
No need to create and publish new Docker images after code changes
No need to manually update the deployment in your remote kubernetes cluster
No need to even know the docker or kubectl CLIs !
Okteto does everything for you and in a completely transparent way!
Developers can now easily test how their software changes behave when deployed as containers-based microservices in the real production kubernetes environment… without even knowing what Docker and kubernetes are!
Once you get over this overwhelming and amazing experience, you may disable your cloud native environment by pressing Ctrl+C and then Ctrl+D in your terminal window. From there you can remove your deployment and replace it with the original one, running:
$ okteto down
Any questions or comments please let me know in the comments section below, Twitter or LinkedIn. See you in my next post, stay tuned!
Join DevNet: access the learning labs, docs, and sandboxes you need for network automation and application development.
Developing Like a Boss – DevOps Series, Part 12 published first on https://brightendentalhouston.tumblr.com/
0 notes